Build a multi-agent system with the A2A protocol#

This tutorial guides you through building and deploying a multi-agent system where agents communicate using the A2A (Agent-to-Agent) protocol. The system is built on Ray Serve for scalable deployment, LangChain for agent orchestration, and MCP for tool integration.
If you’re new to Ray Serve and LangChain integration, see this single-agent template first:
Anyscale template: langchain-agent-ray-serve
Ray repository:
langchain_agent_ray_serve
1. Architecture#
Overview#
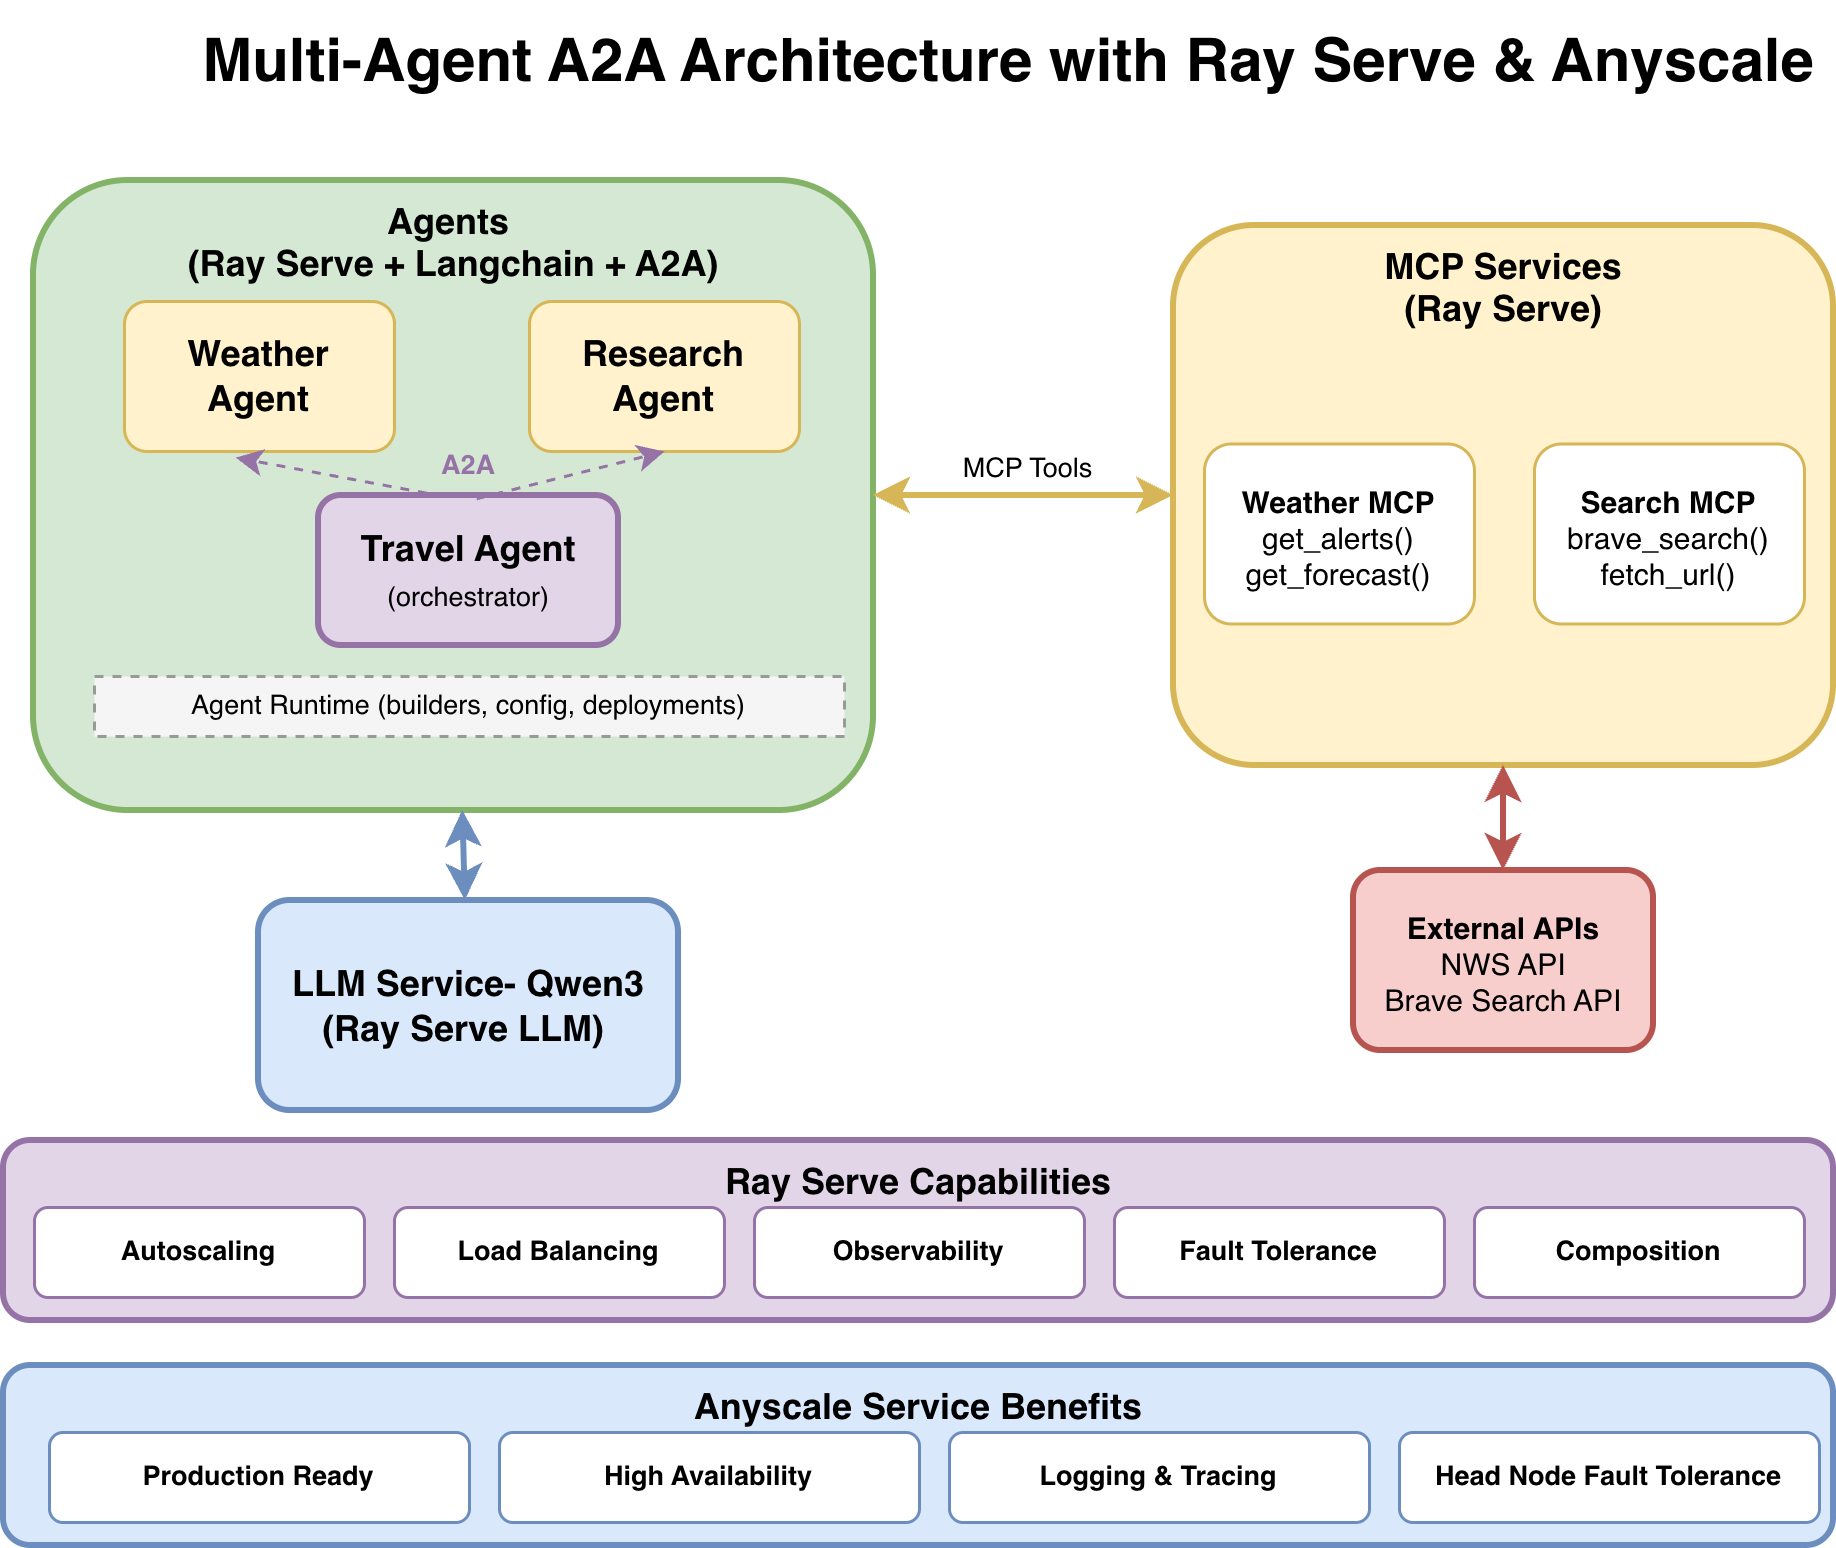
The multi-agent system consists of three agents:
Weather Agent answers weather-related questions using the National Weather Service API.
Research Agent performs web searches and fetches content using Brave Search.
Travel Agent orchestrates both agents using the A2A protocol to create comprehensive travel plans, delegating tasks to the Weather Agent and Research Agent as needed.
Each agent runs as an independent, autoscaling service with two interfaces: SSE for human-to-agent chat and A2A for agent-to-agent communication.
Key terminology#
Agent: The LangChain workflow/logic that decides what actions to take and calls tools.
Deployment / Service: The Ray Serve application that hosts an agent (or MCP/LLM) behind HTTP.
SSE endpoint: Human-to-agent chat endpoint with streaming support, such as
POST /weather-agent/chat.A2A endpoint: Agent-to-agent endpoints for discovery and execution, such as
GET /.well-known/agent-card.jsonandPOST /v1/message:send.
System components#
Component |
Description |
Interface |
Resources |
|---|---|---|---|
LLM Service |
|
OpenAI-compatible API |
1x L4 GPU |
Weather MCP |
National Weather Service tools |
MCP protocol |
0.2 CPU |
Web Search MCP |
Brave search and URL fetching |
MCP protocol |
0.2 CPU |
Weather Agent |
Answers weather questions. |
SSE + A2A |
1 CPU |
Research Agent |
Performs web research. |
SSE + A2A |
1 CPU |
Travel Agent |
Orchestrates other agents. |
SSE + A2A |
1 CPU |
Endpoint map#
Use case |
Endpoint |
|---|---|
LLM (OpenAI-compatible) |
|
Weather agent (human chat, SSE) |
|
Research agent (human chat, SSE) |
|
Travel agent (human chat, SSE) |
|
A2A discovery (any A2A agent) |
|
A2A execute (blocking, any A2A agent) |
|
A2A execute (streaming, any A2A agent) |
|
A2A task/status (poll and history) |
|
Data flow example: travel planning request#
┌──────┐
│ User │
└──┬───┘
   │ POST /travel-agent/chat
   │ "Plan a trip to Seattle"
   ▼
┌──────────────┐
│ Travel Agent │
└──────┬───────┘
       │ LLM Reasoning:
       │   1. Analyze user request
       │   2. Call a2a_research("Seattle attractions")
       │   3. Call a2a_weather("Seattle weather")
       │   4. Synthesize final itinerary
       │
       ├────────────────────────────────────────────────┐
       │                                                │
       ▼                                                ▼
┌───────────────────┐                        ┌───────────────────┐
│  Research Agent   │                        │  Weather Agent    │
│  (via A2A)        │                        │  (via A2A)        │
└────────┬──────────┘                        └────────┬──────────┘
         │                                            │
         ▼                                            ▼
┌───────────────────┐                        ┌───────────────────┐
│ Web Search MCP    │                        │ Weather MCP       │
│ (Brave + Fetch)   │                        │ (NWS API)         │
└───────────────────┘                        └───────────────────┘
         │                                            │
         └──────────────────┬─────────────────────────┘
                            │
                            ▼
                    ┌───────────────┐
                    │ Final Result  │
                    │ (Itinerary +  │
                    │  Weather +    │
                    │  Sources)     │
                    └───────────────┘
Why this architecture?#
Benefits of A2A over direct integration:
Aspect |
Direct integration |
A2A protocol |
|---|---|---|
Coupling |
Tight |
Loose |
Discovery |
Hard-coded |
Dynamic ( |
Versioning |
Code changes |
Protocol-level |
Debugging |
Complex |
Traceable per-task |
Composition |
Nested code |
HTTP boundaries |
Ray Serve capabilities:
Autoscaling: Ray Serve automatically adjusts the number of replicas for each agent based on traffic demand, allowing GPUs for the LLM and CPUs for agents to scale independently while maintaining responsiveness during peak usage.
Load balancing: Ray Serve distributes incoming requests across available agent replicas, preventing any single instance from becoming overwhelmed and maintaining consistent performance.
Observability: Built-in monitoring capabilities provide visibility into your agents’ performance, including request metrics, resource utilization, and system health indicators.
Fault tolerance: Ray Serve automatically detects and recovers from failures by restarting failed agents and redistributing requests to healthy replicas. If the Research Agent fails, the Weather Agent continues working, and the Travel Agent gracefully handles partial failures.
Composition: Build complex multi-agent workflows by orchestrating multiple deployments into a single pipeline. The Travel Agent orchestrates Weather and Research agents without knowing their implementation details, using A2A for agent communication and MCP for tool access.
Anyscale service additional benefits:
Production ready: Anyscale provides enterprise-grade infrastructure management and automated deployments that make your multi-agent service ready for real-world production traffic.
High availability: Advanced Availability Zone aware scheduling and zero-downtime rolling updates ensure your agents maintain high availability. See Update an Anyscale service.
Logging and tracing: Enhanced observability with comprehensive logging, distributed tracing, and real-time monitoring dashboards that provide deep insights into agent-to-agent request flows and system performance. See Monitor a service.
Head node fault tolerance: Additional resilience through managed head node redundancy, protecting against single points of failure in your Ray cluster’s coordination layer. See Head node fault tolerance.
For more information, see the Anyscale Services documentation.
2. Project structure#
multi-agent-a2a/
├── agents/                      # Agent implementations
│   ├── weather_agent_with_mcp.py
│   ├── research_agent_with_web_search_mcp.py
│   └── travel_agent_with_a2a.py
├── agent_runtime/               # Shared runtime utilities
│   ├── config.py                # Configuration management
│   ├── agent_builder.py         # Agent factory functions
│   ├── serve_deployment.py      # SSE deployment factory
│   └── a2a_deployment.py        # A2A deployment factory
├── protocols/                   # A2A SDK helpers (cards + client)
│   ├── a2a_card.py
│   └── a2a_client.py
├── mcps/                        # MCP server implementations
│   ├── weather_mcp_server.py
│   └── web_search_mcp_server.py
├── llm/                         # LLM deployment
│   └── llm_deploy_qwen.py
├── tests/                       # Test suite
├── ray_serve_all_deployments.py # Unified deployment entrypoint
├── serve_multi_config.yaml      # Local Ray Serve deployment config
├── anyscale_service_multi_config.yaml # Anyscale production deployment config
└── requirements.txt             # Python dependencies
3. Get started with local deployment#
Get the system running first, then explore how it works.
Prerequisites#
Docker image:
Use
anyscale/ray-llm:2.50.1-py311-cu128for optimal compatibility.
Compute requirements:
1x L4 GPU (g6.2xlarge, 24 GB GPU memory) for the LLM service.
1x m5d.xlarge (4 vCPU) for MCP servers and agents.
Install dependencies:
Install all Python dependencies from requirements.txt:
!pip install -r requirements.txt
Obtain a Brave Search API key#
To get a Brave Search API key, sign up at brave.com/search/api. The free tier includes 2,000 requests per month.
Set up environment variables following the Anyscale Workspace environment variables guide.
Run this in your terminal (outside the notebook) before starting services:
export BRAVE_API_KEY=<your-brave-api-key>
Deploy all services locally#
Start Ray Serve and deploy all services with a single command in the terminal:
serve run serve_multi_config.yaml
This command deploys all the following services:
LLM Service at
/llm.Weather MCP Server at
/mcp-weather.Web Search MCP Server at
/mcp-web-search.Weather Agent at
/weather-agent(SSE) and/a2a-weather(A2A).Research Agent at
/research-agent(SSE) and/a2a-research(A2A).Travel Agent at
/travel-agent(SSE) and/a2a-travel(A2A).
Confirm the deployment#
After all services have started, verify each layer as follows:
Test services individually (with curl): Run each of the following curl commands separately and check their responses:
LLM (OpenAI-compatible)
!curl -X POST http://127.0.0.1:8000/llm/v1/chat/completions -H "Content-Type: application/json" -d '{"model": "Qwen/Qwen3-4B-Instruct-2507-FP8", "messages": [{"role": "user", "content": "Hello!"}]}'
Weather Agent (SSE interface)
!curl -X POST http://127.0.0.1:8000/weather-agent/chat -H "Content-Type: application/json" -d '{"user_request": "What is the weather in San Francisco?"}'
Research Agent (SSE interface)
!curl -X POST http://127.0.0.1:8000/research-agent/chat -H "Content-Type: application/json" -d '{"user_request": "What are the top attractions in Seattle? Reply with sources."}'
Travel Agent (SSE interface, orchestrates other agents through A2A)
!curl -X POST http://127.0.0.1:8000/travel-agent/chat -H "Content-Type: application/json" -d '{"user_request": "Plan a 2-day trip to Seattle next week. Include weather details and considerations."}'
A2A discovery (AgentCards)
!curl http://127.0.0.1:8000/a2a-weather/.well-known/agent-card.json
!curl http://127.0.0.1:8000/a2a-research/.well-known/agent-card.json
!curl http://127.0.0.1:8000/a2a-travel/.well-known/agent-card.json
Run the full test suite#
# Run all tests
!python tests/run_all.py
4. Deploy to production on Anyscale#
To deploy to production on Anyscale:
!anyscale service deploy -f anyscale_service_multi_config.yaml
Note: An Anyscale service config is a superset of a Ray Serve config. For more details, see the Anyscale service config docs.
Test the production services#
After deploying to Anyscale, your service is available at a URL like:
https://<service-name>-<id>.cld-<cluster-id>.s.anyscaleuserdata.com
You also receive an authentication token for secure access.
To follow the same structure as the local serve run ... deployment, verify production in two steps: (1) test each service directly with curl, then (2) run the full test suite.
Set up environment variables (once):
In a notebook:
%env BASE_URL=<ANYSCALE_SERVICE_URL>
%env ANYSCALE_API_TOKEN=<AUTH_TOKEN>
Note: Don’t include a trailing
/at the end ofBASE_URL(after.anyscaleuserdata.com).
Test services individually (with curl): Run each of the following curl commands separately and check their responses:
LLM (OpenAI-compatible)
!curl -X POST "${BASE_URL}/llm/v1/chat/completions" -H "Content-Type: application/json" -H "Authorization: Bearer ${ANYSCALE_API_TOKEN}" -d '{"model": "Qwen/Qwen3-4B-Instruct-2507-FP8", "messages": [{"role": "user", "content": "Hello!"}]}'
Weather Agent (SSE interface)
!curl -X POST "${BASE_URL}/weather-agent/chat" -H "Content-Type: application/json" -H "Authorization: Bearer ${ANYSCALE_API_TOKEN}" -d '{"user_request": "What is the weather in San Francisco?"}'
Research Agent (SSE interface)
!curl -X POST "${BASE_URL}/research-agent/chat" -H "Content-Type: application/json" -H "Authorization: Bearer ${ANYSCALE_API_TOKEN}" -d '{"user_request": "What are the top attractions in Seattle? Reply with sources."}'
Travel Agent (SSE interface, orchestrates other agents through A2A)
!curl -X POST "${BASE_URL}/travel-agent/chat" -H "Content-Type: application/json" -H "Authorization: Bearer ${ANYSCALE_API_TOKEN}" -d '{"user_request": "Plan a 2-day trip to Seattle next week. Include weather details and considerations."}'
A2A discovery (AgentCards)
!curl "${BASE_URL}/a2a-weather/.well-known/agent-card.json" -H "Authorization: Bearer ${ANYSCALE_API_TOKEN}"
!curl "${BASE_URL}/a2a-research/.well-known/agent-card.json" -H "Authorization: Bearer ${ANYSCALE_API_TOKEN}"
!curl "${BASE_URL}/a2a-travel/.well-known/agent-card.json" -H "Authorization: Bearer ${ANYSCALE_API_TOKEN}"
Run the test suite against production#
You can run the full test suite against your production deployment. Set a preventive timeout:
In a notebook:
%env TEST_TIMEOUT_SECONDS=2000
!python tests/run_all.py
5. Deep dive: Understand each component#
Explore how each service is implemented.
5.1 The LLM service#
See the code in llm/llm_deploy_qwen.py. This file deploys Qwen as an OpenAI-compatible API with tool calling support.
Key configurations:
max_model_len=65536: Provides a 64K token context window for complex multi-turn conversations with multiple tool calls.enable_auto_tool_choice=True: Enables the model to automatically decide when to use tools, which is essential for agent workflows.tool_call_parser="hermes": Parses tool calls in Hermes format, which Qwen models support natively.
For detailed information on deploying and configuring LLM services, see the Anyscale LLM serving documentation and the Deploy LLM template.
5.2 The MCP tool services#
MCP (Model Context Protocol) servers expose external tools that agents can discover and use dynamically.
Ray Serve only supports stateless HTTP mode in MCP. Set stateless_http=True to prevent “session not found” errors when running multiple replicas.
For more information, see the Anyscale MCP documentation and MCP Ray Serve template.
5.2.1 Weather MCP server#
See mcps/weather_mcp_server.py:
Tool |
Description |
Parameters |
|---|---|---|
|
Fetches active weather alerts. |
|
|
Gets a five-period forecast. |
|
5.2.2 Web search MCP server#
See mcps/web_search_mcp_server.py:
Tool |
Description |
Parameters |
|---|---|---|
|
Searches the web through the Brave Search API. |
|
|
Fetches and parses web pages. |
|
5.3 The agent runtime#
The agent runtime provides a builder pattern for creating agents and deploying them with both SSE (human-to-agent) and A2A (agent-to-agent) interfaces. This shared infrastructure eliminates code duplication across agents by centralizing configuration, agent building, and deployment logic.
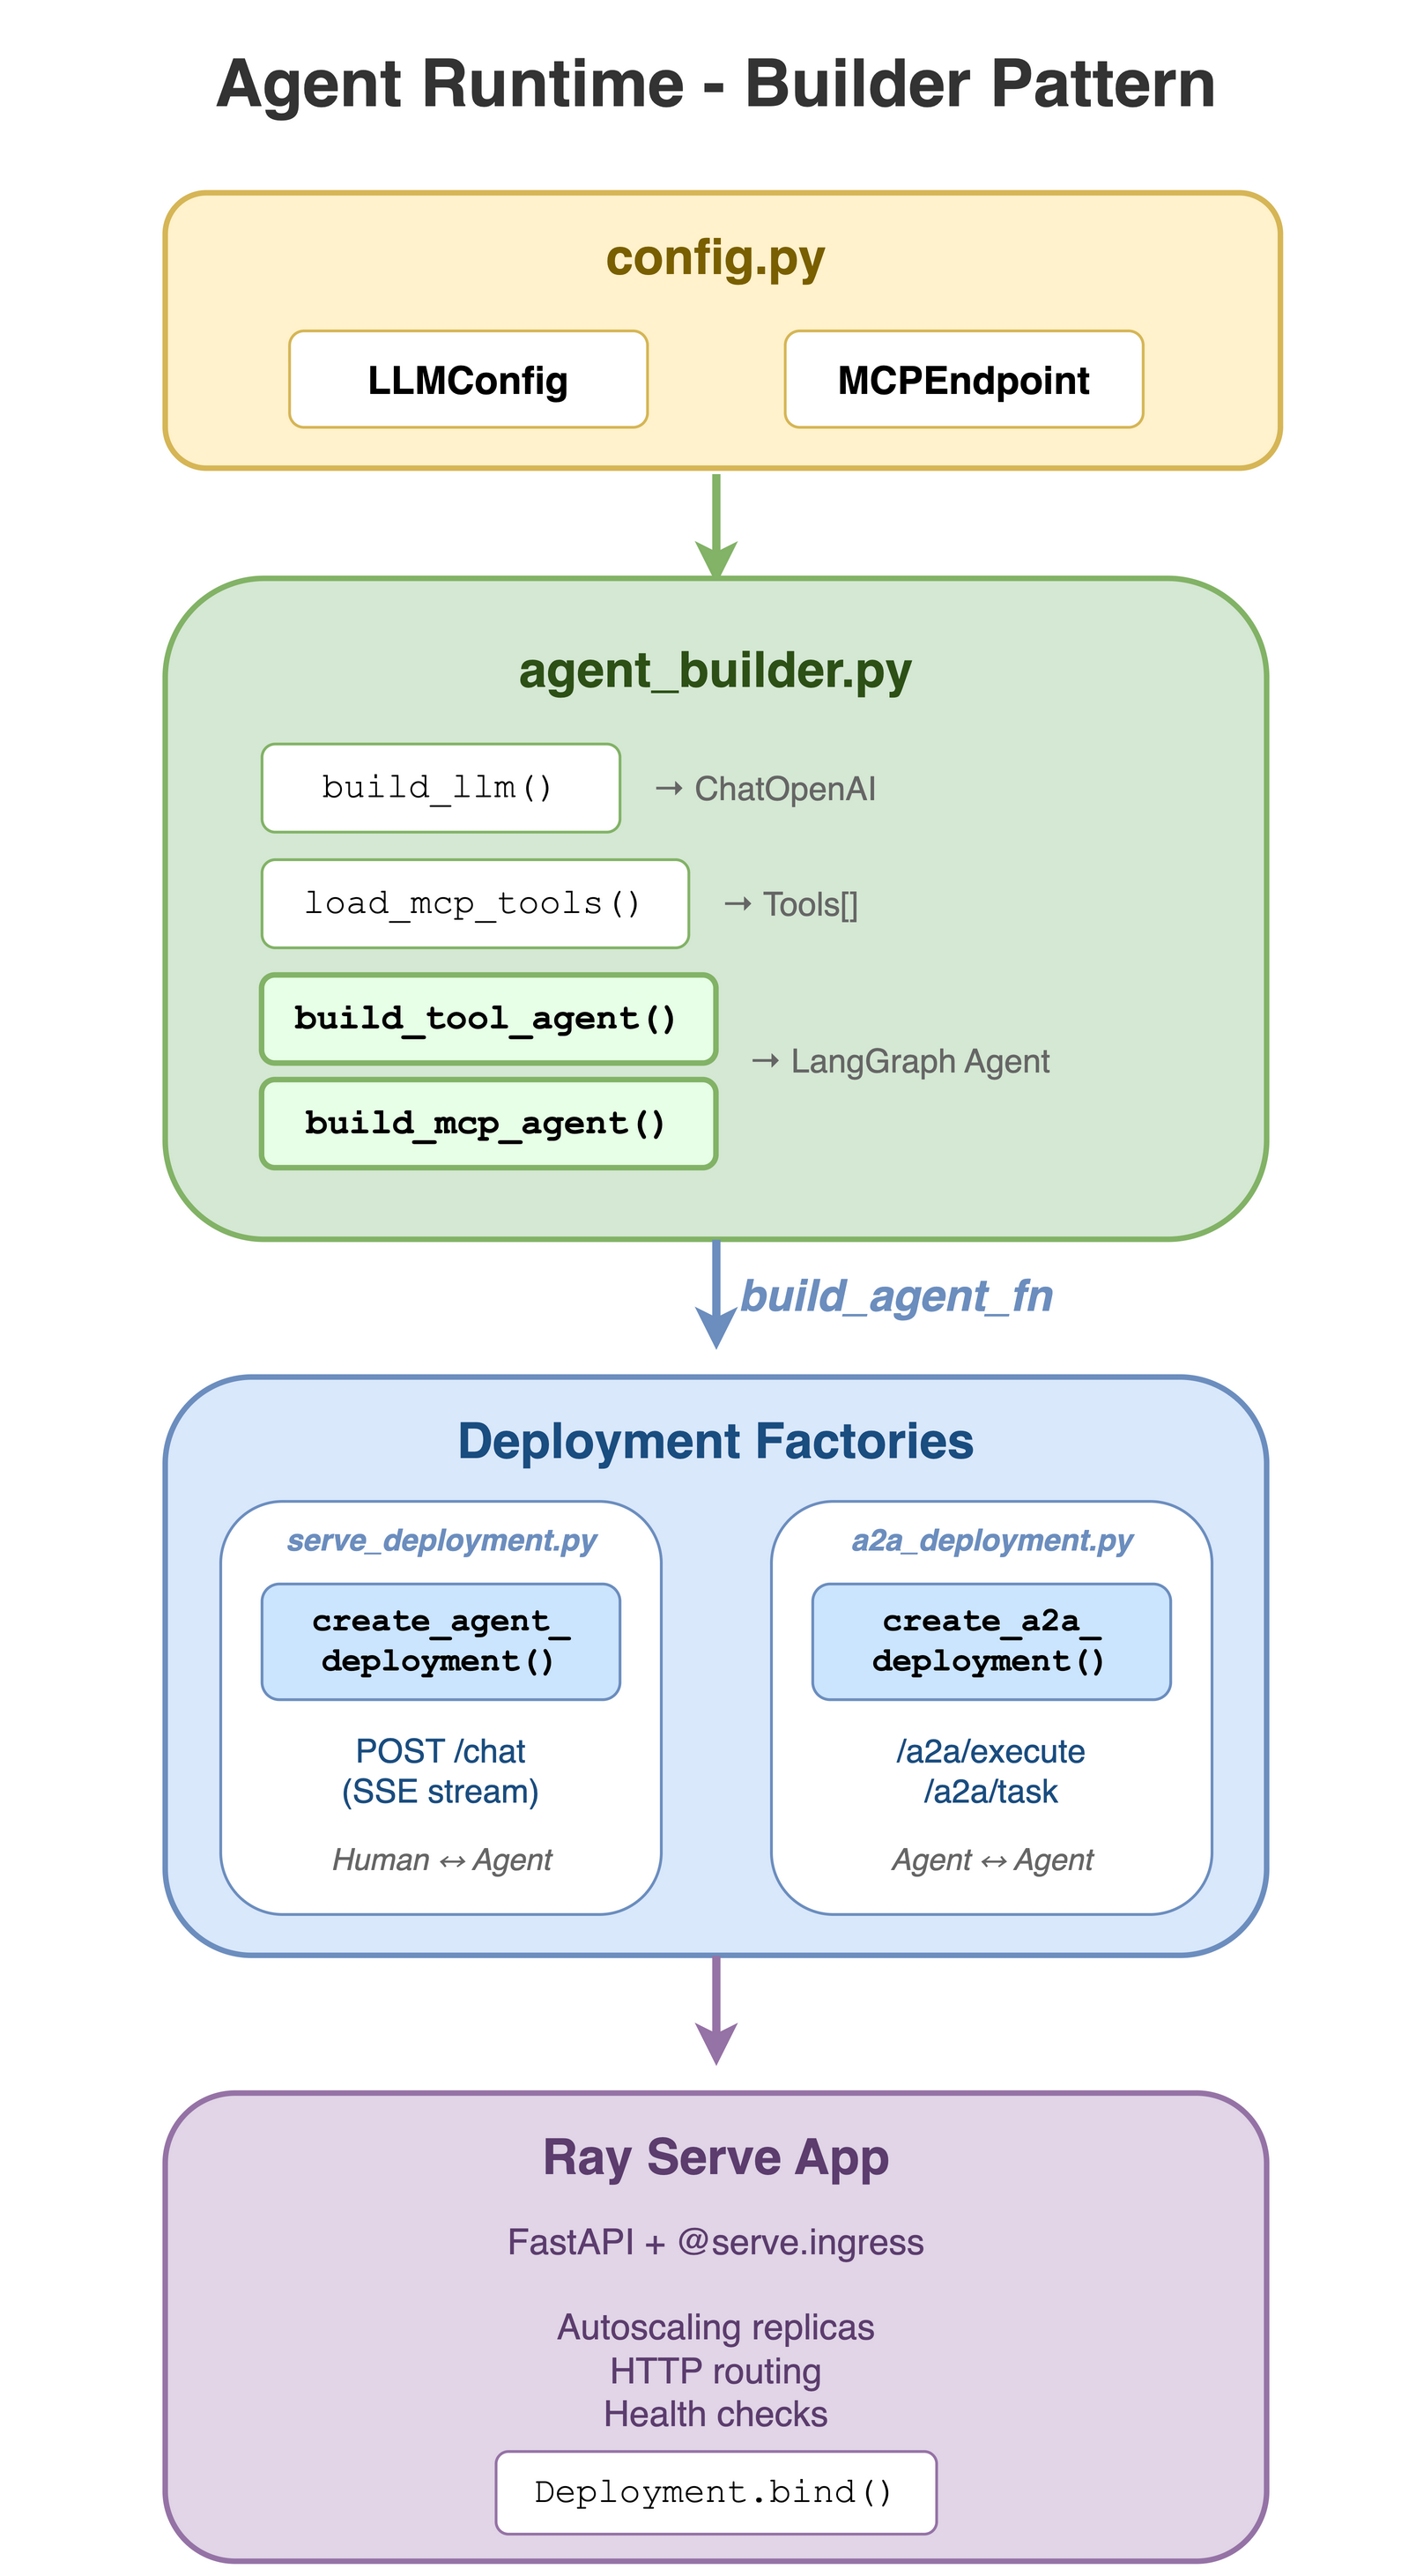
The agent runtime consists of four core modules:
5.3.1 Configuration management#
The configuration module agent_runtime/config.py centralizes configuration loading for LLM and MCP settings from environment variables.
Classes:
LLMConfig(LLM backend settings) andMCPEndpoint(MCP server configuration).Functions:
load_llm_config().
5.3.2 Agent building helpers#
The agent builder module agent_runtime/agent_builder.py provides factory functions for building LangChain agents, centralizing LLM setup, MCP tool discovery, and agent creation to eliminate boilerplate.
Functions:
build_llm(),load_mcp_tools(),build_tool_agent(), andbuild_mcp_agent().Logic handled: Configuration loading, LLM construction, dynamic MCP tool discovery, and agent creation with
MemorySavercheckpointing.
5.3.3 SSE deployment factory#
The SSE deployment module agent_runtime/serve_deployment.py builds the FastAPI application and Ray Serve deployment for the human-to-agent chat interface.
Endpoints: Exposes
POST /chatwith SSE streaming support.Functions:
create_chat_app()andcreate_serve_deployment().Features: Real-time SSE streaming, conversation continuity through Thread IDs, and automatic LangChain event serialization.
5.3.4 A2A deployment factory#
The A2A deployment module agent_runtime/a2a_deployment.py enables standardized agent-to-agent communication by creating Ray Serve deployments with A2A protocol compliance.
5.4 The specialized agents#
Each specialized agent is a LangChain agent that combines an LLM with specific tools. The agents use the builder pattern from the agent runtime to minimize boilerplate code.
Weather agent#
File: agents/weather_agent_with_mcp.py
This agent provides weather information using tools from the Weather MCP server. It demonstrates the MCP integration pattern where tools are dynamically discovered from the MCP server.
Implementation approach:
Uses
build_mcp_agent()from agent runtime to create the agent.Connects to Weather MCP server endpoint.
Tools are auto-discovered from the MCP server (
get_alerts,get_forecast).
System prompt strategy:
Break tasks into sub-questions (for example, finding coordinates first).
Use weather tools to get current conditions and forecasts.
Provide concise, actionable answers.
Request flow example:
User sends: “What’s the weather in Palo Alto?”
Agent reasons: “I need coordinates for Palo Alto.”
Agent calls
get_forecast(37.4419, -122.1430).MCP server fetches data from the National Weather Service API.
Agent formats and returns the response.
Configuration:
WEATHER_MCP_BASE_URL- Base URL for Weather MCP server.WEATHER_MCP_TOKEN- Optional authentication token.
Research agent#
File: agents/research_agent_with_web_search_mcp.py
This agent performs online research and gathers sources using the Web Search MCP server. It demonstrates how to combine multiple MCP tools (search + fetch) for comprehensive research workflows.
Implementation approach:
Uses
build_mcp_agent()from agent runtime.Connects to Web Search MCP server endpoint.
Tools are auto-discovered (
brave_search,fetch_url).
System prompt strategy:
Break research tasks into sub-questions.
Use
brave_searchfirst to find relevant sources.Use
fetch_urlto read primary sources and confirm details.Never fabricate information; explicitly state when unable to verify.
Include sources as a bullet list of URLs in the final answer.
Request flow example:
User sends: “What are the top attractions in Seattle?”
Agent calls
brave_search("Seattle top attractions", num_results=10).Agent calls
fetch_url(url)for promising results.Agent synthesizes information and includes source URLs.
Configuration:
WEB_SEARCH_MCP_BASE_URL- Base URL for Web Search MCP server.WEB_SEARCH_MCP_TOKEN- Optional authentication token.
Travel agent (multi-agent orchestration)#
File: agents/travel_agent_with_a2a.py
This agent demonstrates agent-to-agent communication using the A2A protocol. Instead of connecting to MCP servers directly, it orchestrates two downstream agents (Weather and Research) to create comprehensive travel plans.
Implementation approach:
Uses
build_tool_agent()from agent runtime with explicit A2A tools.Defines two custom tools that wrap A2A calls:
a2a_research(query)- Calls Research Agent through A2A.a2a_weather(query)- Calls Weather Agent through A2A.
Uses
a2a_execute_text()helper for agent-to-agent communication.
System prompt strategy:
Always call both tools (research and weather) at least once.
Ask clarifying questions if missing key constraints (dates, budget, origin, travelers, pace, interests).
Produce structured travel plans with:
Assumptions and trip summary.
Day-by-day itinerary (morning/afternoon/evening).
Weather-aware packing and timing suggestions.
Budget outline (high/medium/low).
Bookings checklist and local transit notes.
Sources (from research tool output).
Request flow example:
User sends: “Plan a 3-day trip to Seattle next week.”
Travel agent calls
a2a_research("Seattle attractions, restaurants, activities").Travel agent calls
a2a_weather("Seattle weather forecast next week").Travel agent synthesizes both responses into a structured itinerary.
Configuration:
RESEARCH_A2A_BASE_URL- Base URL for Research Agent A2A endpoint (default:http://127.0.0.1:8000/a2a-research).WEATHER_A2A_BASE_URL- Base URL for Weather Agent A2A endpoint (default:http://127.0.0.1:8000/a2a-weather).A2A_TIMEOUT_S- Timeout for downstream agent calls (default: 360 seconds).
A2A tool implementation:
from langchain_core.tools import tool
from protocols.a2a_client import a2a_execute_text

@tool
async def a2a_research(query: str) -> str:
    """Call the Research agent over A2A to gather up-to-date info and sources."""
    return await a2a_execute_text(RESEARCH_A2A_BASE_URL, query, timeout_s=A2A_TIMEOUT_S)

@tool
async def a2a_weather(query: str) -> str:
    """Call the Weather agent over A2A to get weather/forecast guidance."""
    return await a2a_execute_text(WEATHER_A2A_BASE_URL, query, timeout_s=A2A_TIMEOUT_S)
5.5 The A2A protocol and helpers#
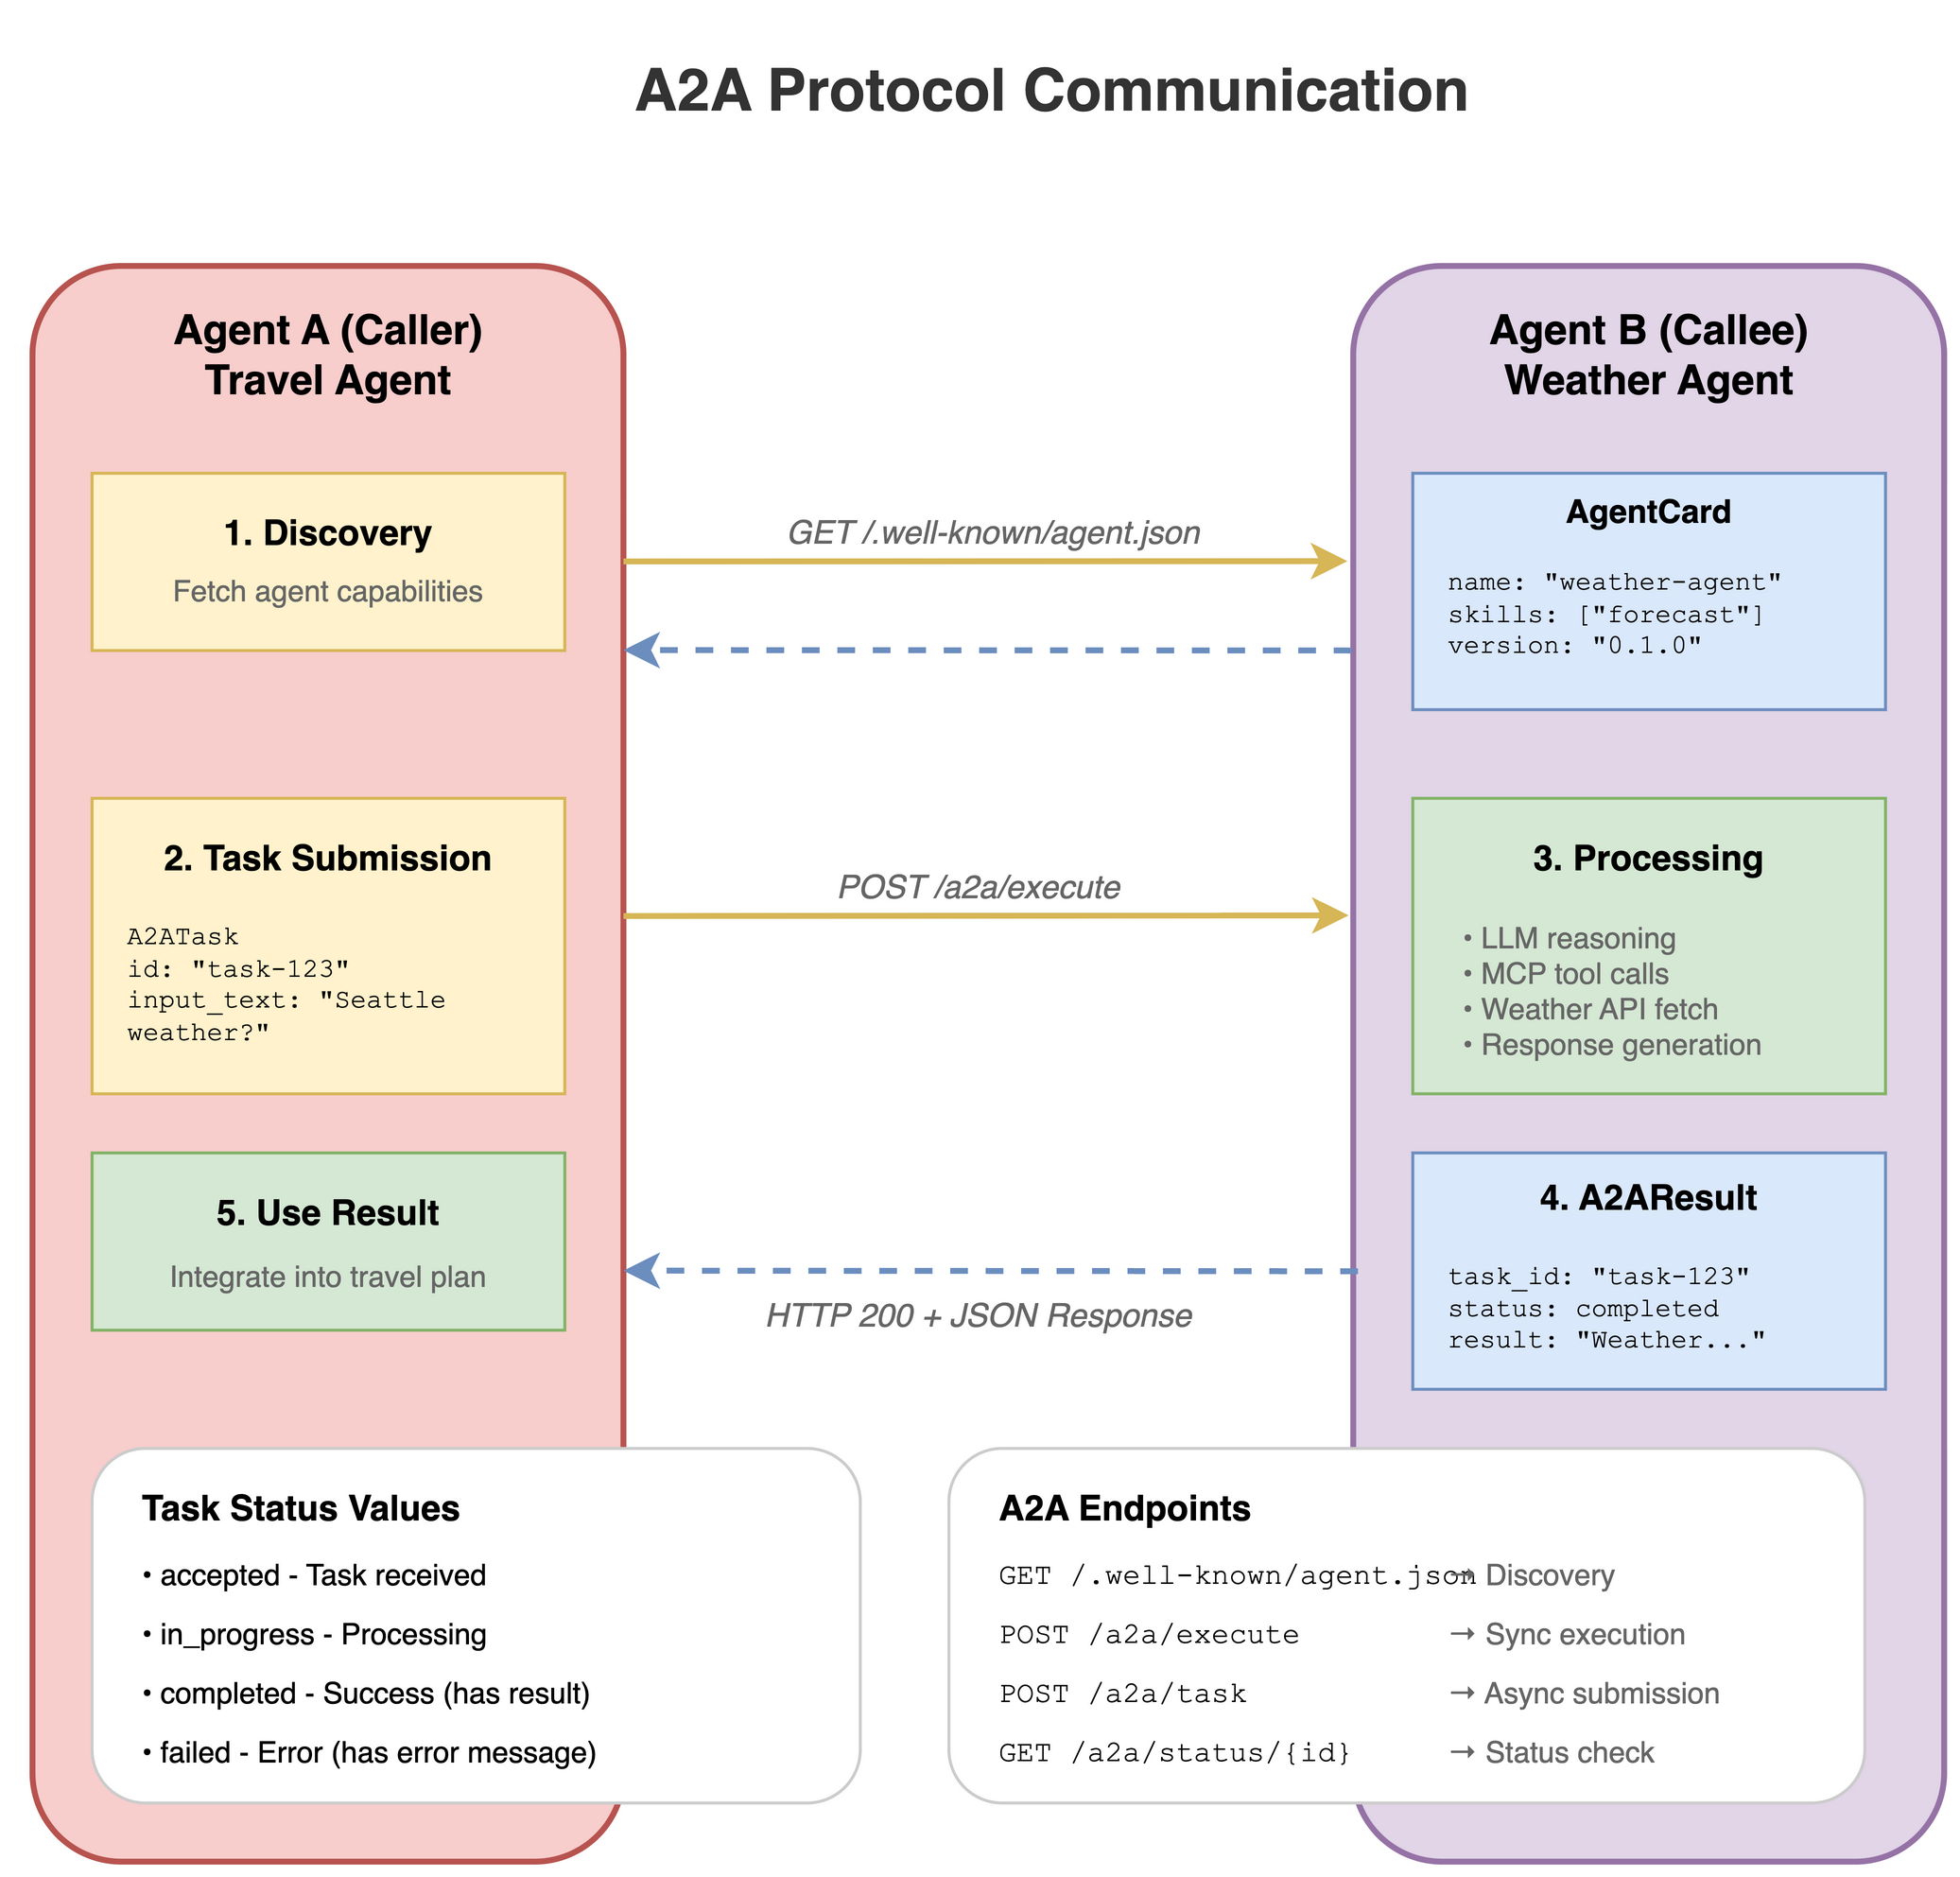
The A2A (Agent-to-Agent) protocol enables standardized agent-to-agent communication. This system uses the official a2a-sdk with custom helper utilities.
A2A components:
Server endpoints:
agent_runtime/a2a_deployment.py(deployment factory).AgentCard helper:
protocols/a2a_card.py(discovery).Client helper:
protocols/a2a_client.py(execution).
AgentCard helper#
File: protocols/a2a_card.py
This module provides utilities for creating A2A AgentCards using the official a2a-sdk types. AgentCards enable agent discovery by advertising capabilities, skills, and endpoints.
Key function:
build_agent_card()- Creates ana2a.types.AgentCardfor HTTP+JSON (REST) agents.
Usage:
from protocols.a2a_card import build_agent_card

card = build_agent_card(
    name="weather-agent",
    description="Weather agent that uses a Weather MCP server",
    version="0.1.0",
    skills=["weather", "forecast", "current_conditions"],
    url="http://127.0.0.1:8000/a2a-weather"
)
AgentCard format:
AgentCards are exposed at GET /.well-known/agent-card.json for A2A discovery:
{
  "name": "weather-agent",
  "description": "Weather agent that uses a Weather MCP server...",
  "version": "0.1.0",
  "url": "http://127.0.0.1:8000/a2a-weather",
  "preferred_transport": "http+json",
  "capabilities": {
    "streaming": true,
    "push_notifications": false,
    "state_transition_history": false
  },
  "default_input_modes": ["text/plain"],
  "default_output_modes": ["text/plain"],
  "skills": [
    {
      "id": "weather-agent-primary",
      "name": "weather-agent",
      "description": "Weather agent that uses a Weather MCP server...",
      "tags": ["weather", "forecast", "current_conditions"]
    }
  ]
}
Client helper#
File: protocols/a2a_client.py
Agents that orchestrate other agents use this client for agent-to-agent communication through the official a2a-sdk REST transport.
Key function:
a2a_execute_text()- Sends a single text message to an A2A agent and returns the text response.
Features:
Uses official
a2a-sdkREST transport.Handles message creation with proper types (
Role.user,TextPart).Extracts text from Task/Message responses.
Configurable timeouts for long-running agent calls.
Optional HTTP headers for authentication.
Usage:
from protocols.a2a_client import a2a_execute_text

result = await a2a_execute_text(
    base_url="http://127.0.0.1:8000/a2a-weather",
    input_text="What's the forecast for Seattle?",
    timeout_s=60.0,
    headers={"Authorization": "Bearer <token>"}  # Optional
)
print(result)
A2A REST endpoints#
Standard A2A endpoints (exposed by all A2A agents):
Endpoint |
Description |
|---|---|
|
Returns the AgentCard for discovery. |
|
Executes a message (blocking). |
|
Executes a message (SSE streaming). |
|
Fetches and polls task state and history. |
Test A2A endpoints:
# Test A2A discovery
!curl http://127.0.0.1:8000/a2a-weather/.well-known/agent-card.json

# For execution, prefer the Python helper:
# python -c 'import asyncio; from protocols.a2a_client import a2a_execute_text; print(asyncio.run(a2a_execute_text("http://127.0.0.1:8000/a2a-weather","Weather in NYC?")))'
5.5.4 Call an agent through A2A#
Use the a2a_execute_text helper for text-based calls:
from protocols.a2a_client import a2a_execute_text

# Call the Weather Agent via A2A
result = await a2a_execute_text(
    base_url="http://127.0.0.1:8000/a2a-weather",
    input_text="What's the forecast for Seattle?",
    timeout_s=60.0
)
print(result)
You can also test discovery directly:
!curl http://127.0.0.1:8000/a2a-weather/.well-known/agent-card.json
5.6 The unified deployment configuration#
See serve_multi_config.yaml for the complete deployment configuration.
Autoscaling configuration:
The system uses Ray Serve’s built-in autoscaling to handle variable load. See the configuration details in serve_multi_config.yaml.
6. Next steps#
Build your own agents (or a multi-agent system) using the agent runtime
Start from the builder pattern in 5.3 The agent runtime and adapt the existing agents to your use case.
Add or modify tools and prompts, update your Agent Card metadata, and deploy with Ray Serve so you can test both SSE (human-to-agent) and A2A (agent-to-agent) flows.
Integrate Langfuse for observability, prompt management, and evals
Project:
langfuse/langfuseLLM application observability: Instrument your app and ingest traces to Langfuse to track LLM calls and other logic (retrieval, embedding, agent actions), inspect and debug sessions, and iterate faster.
Prompt management: Centrally manage and version prompts; strong caching on server and client helps you iterate without adding latency.
Evaluations: Run LLM-as-a-judge, collect user feedback, support manual labeling, and build custom evaluation pipelines through APIs and SDKs.
7. Additional resources#
Anyscale LLM Serving Documentation - Detailed guide for deploying and configuring LLM services.
Deploy LLM Template - Template for deploying LLM services on Anyscale.
Anyscale MCP Documentation - Guide for deploying and configuring MCP servers with Ray Serve.
MCP Ray Serve Template - Template for deploying MCP servers on Anyscale.