Deploying a custom MCP in Streamable HTTP mode with Ray Serve#
This tutorial walks through deploying the Weather MCP server in Streamable HTTP mode with Ray Serve and FastAPI, then tests it with a simple Python client and MCP Inspector.
MCP supports three transports:
stdio: Local subprocess with newline-delimited JSON over stdin/stdout. Zero-config but only for local clients.
SSE (legacy, deprecated): HTTP+Server-Sent events, now deprecated in favor of a unified HTTP transport.
Streamable HTTP: A single HTTP endpoint that handles both client→server POSTs and server→client GET/SSE streams.
MCP in stdio mode is suitable for local or personal use, and Streamable HTTP brings remote MCP servers into action for enterprise and production purposes. You can also integrate the Claude APP with remote MCP server.
Integrate MCP in Streamable HTTP mode with Ray Serve on Anyscale#
The following architecture diagram illustrates the integrations of custom MCP with Ray Serve and Anyscale Service:
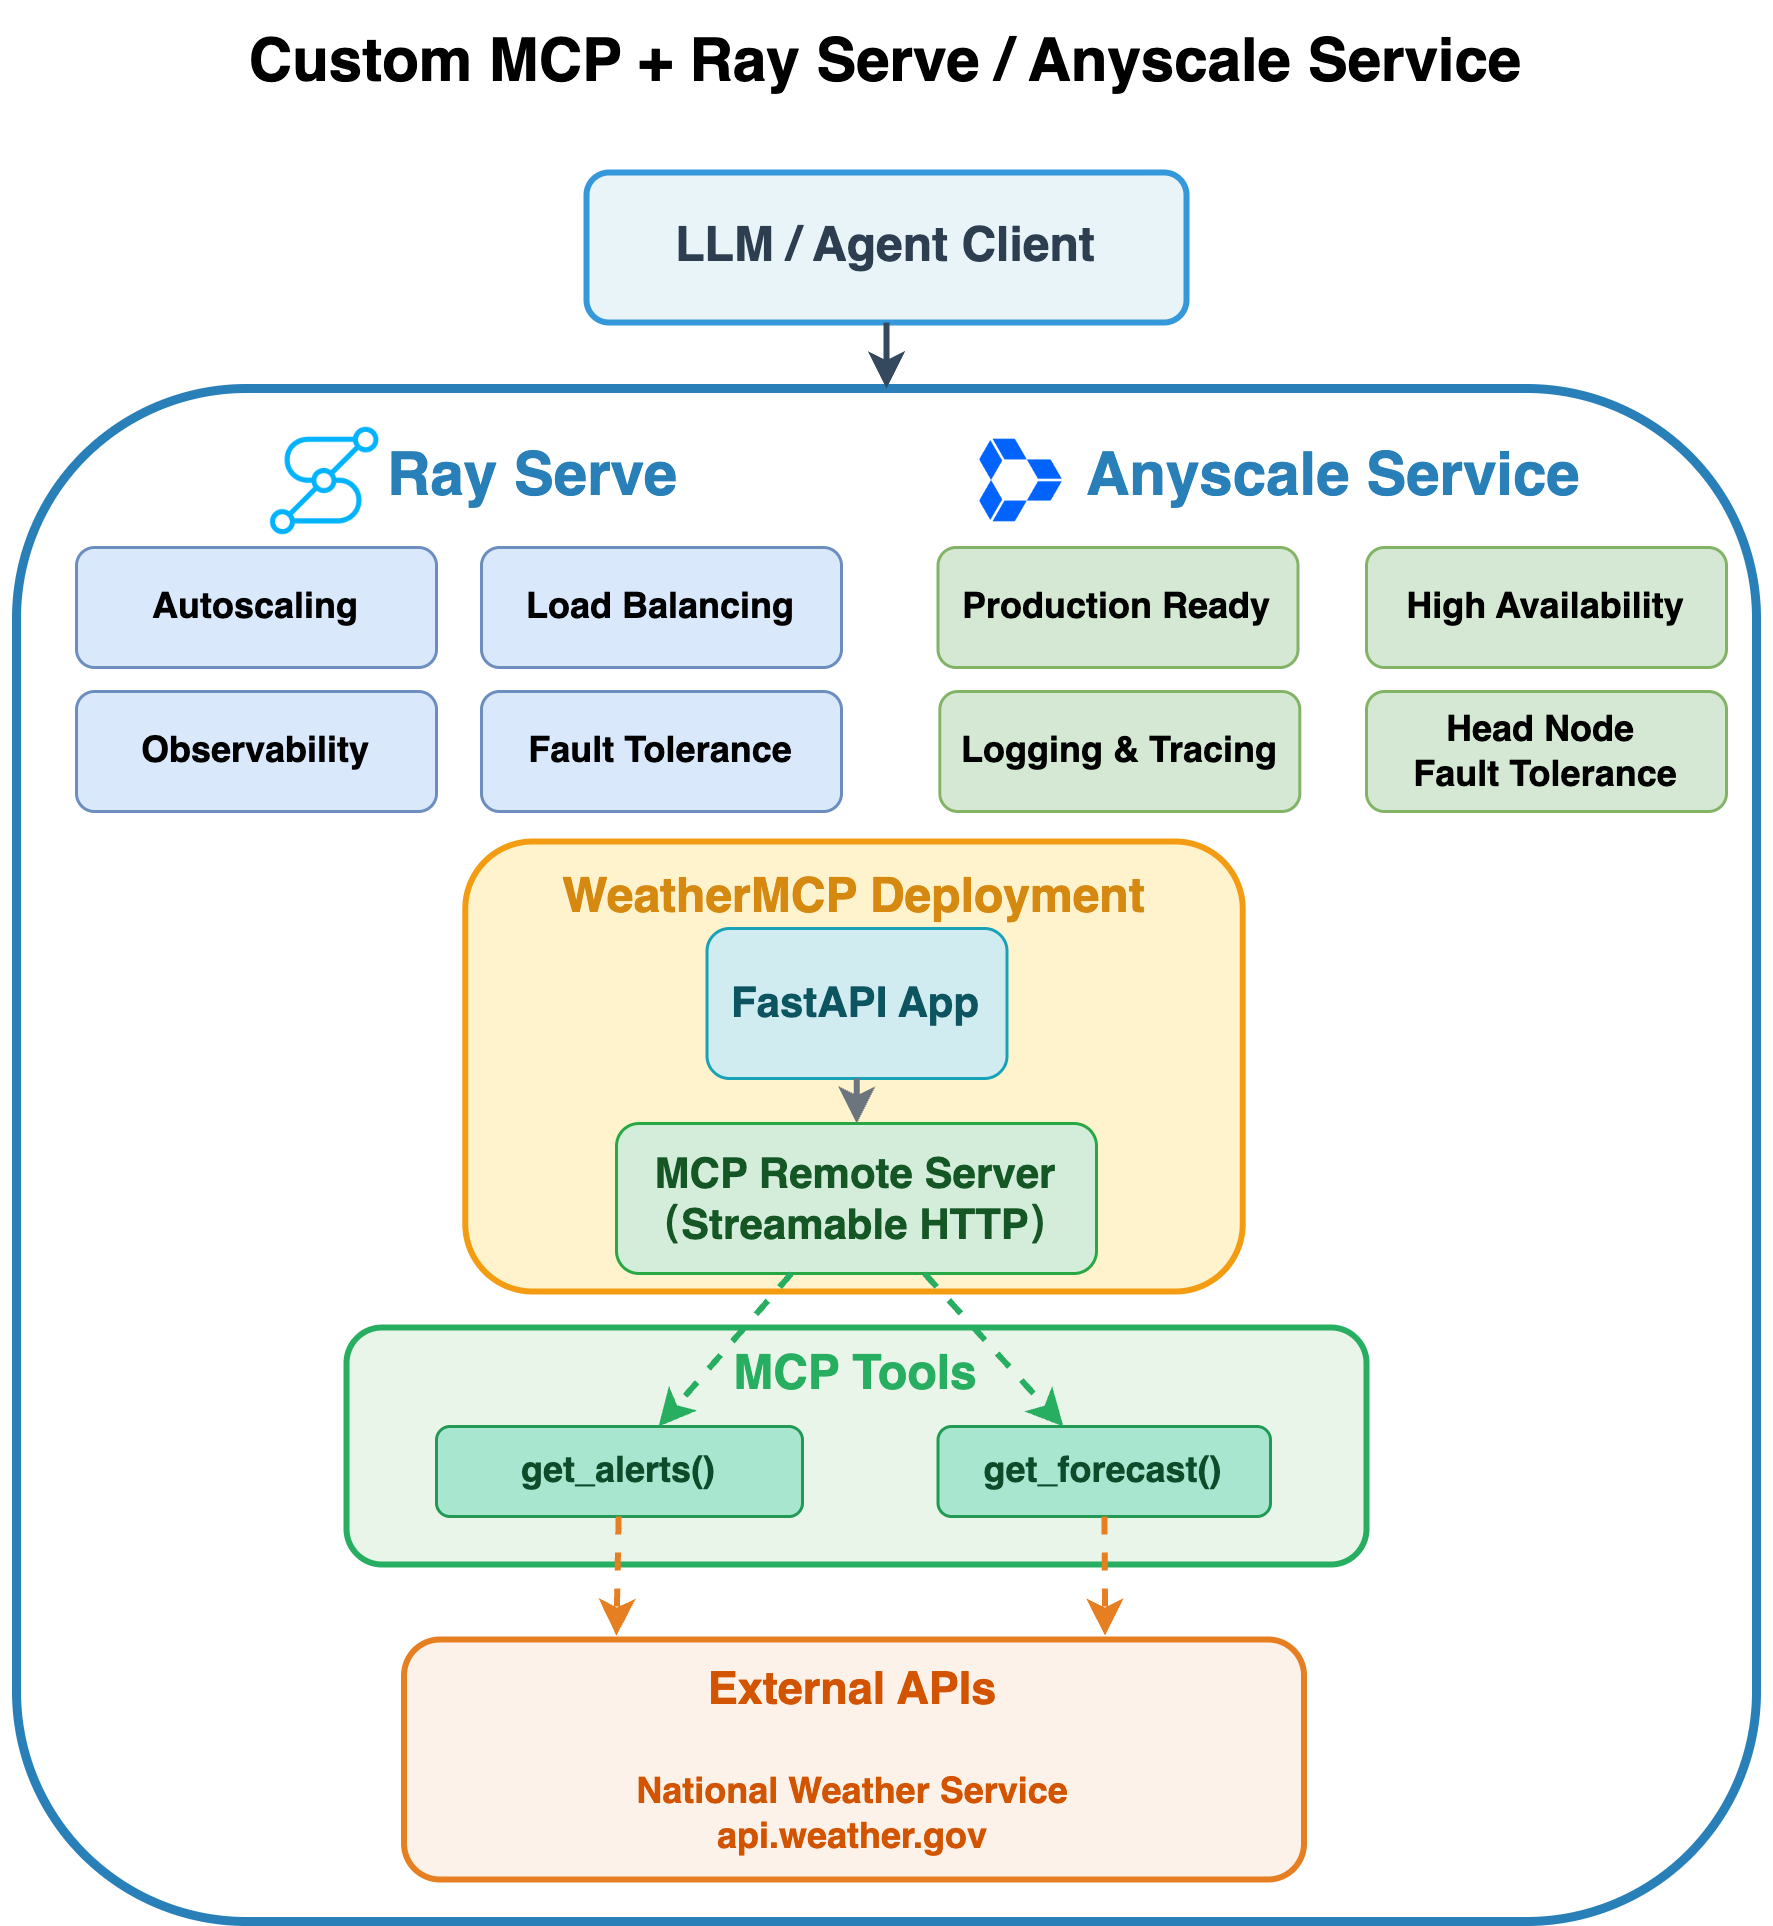
Integrating MCP in Streamable HTTP mode with Ray Serve on Anyscale delivers comprehensive scalability and production-grade capabilities for your AI services through two complementary layers of features:
Ray Serve capabilities:
Autoscaling: Ray Serve automatically adjusts the number of replicas based on traffic demand, ensuring your service handles increased load while maintaining responsiveness during peak usage periods.
Load balancing: Ray Serve intelligently distributes incoming requests across available replicas, preventing any single instance from becoming overwhelmed and maintaining consistent performance.
Observability: Built-in monitoring capabilities provide visibility into your service’s performance, including request metrics, resource utilization, and system health indicators.
Fault tolerance: Ray Serve automatically detects and recovers from failures by restarting failed components and redistributing requests to healthy replicas, ensuring continuous service availability.
Composition: Build complex services by orchestrating multiple deployments into a single pipeline, allowing you to chain preprocessing, model inference, postprocessing, and custom logic seamlessly.
Anyscale service additional benefits:
Production ready: Anyscale provides enterprise-grade infrastructure management, automated deployments that make your MCP service ready for real-world production traffic.
High availability: Advanced Availability Zone aware scheduling mechanisms and zero-downtime rolling updates to ensure your service maintains high availability.
Logging and tracing: Enhanced observability with comprehensive logging, distributed tracing, and real-time monitoring dashboards that provide deep insights into request flows and system performance.
Head node fault tolerance: Additional resilience through managed head node redundancy, protecting against single points of failure in your Ray cluster’s coordination layer.
This combination ensures your MCP service operates with enterprise-level reliability while optimizing resource efficiency and cost-effectiveness.
Prerequisites#
Ray [serve], already included in the base Docker image
MCP Python library
Dependencies#
Install the required Python packages and Podman:
pip install mcp==1.11.0 asyncio==3.4.3 pydantic==2.9.2
Alternative: Docker image for Ray Serve deployment
You can also build a Docker image for deployment on Anyscale using the Dockerfile in this code repo.
Note This Docker image is provided solely to deploy the MCP with Ray Serve.
1. Create the deployment script#
This script sets up a scalable weather alert and forecast service using FastAPI, FastMCP, and Ray Serve.
It defines two asynchronous tools—get_alerts and get_forecast—which retrieve data from the National Weather Service, following the tutorial available at: https://modelcontextprotocol.io/quickstart/server.
Use a FastAPI app configured with Streamable HTTP mode to expose these tools to support real-time, bidirectional communication.
By default, this automatically creates an '/mcp' endpoint: app.mount("/", mcp.streamable_http_app()).
Finally, deploy the entire app using Ray Serve, enabling dynamic autoscaling and distributed inference when you launch it with serve run.
Important note:#
Ray Serve currently only supports the stateless HTTP mode in MCP. Because each replica doesn’t share session state, enabling stateless_http=True prevents “session not found” errors when multiple replicas are running:
mcp = FastMCP("weather", stateless_http=True)
# Save the following code as `weather_mcp_ray.py`.
from typing import Any
import httpx
from fastapi import FastAPI
from mcp.server.fastmcp import FastMCP
import ray
from ray import serve
from contextlib import asynccontextmanager

# Constants.
NWS_API_BASE = "https://api.weather.gov"
USER_AGENT = "weather-app/1.0"

# Helper functions.
async def make_nws_request(url: str) -> dict[str, Any] | None:
    headers = {"User-Agent": USER_AGENT, "Accept": "application/geo+json"}
    async with httpx.AsyncClient(timeout=30.0) as client:
        try:
            resp = await client.get(url, headers=headers)
            resp.raise_for_status()
            return resp.json()
        except Exception:
            return None


def format_alert(feature: dict) -> str:
    props = feature["properties"]
    return (
        f"Event: {props.get('event', 'Unknown')}\n"
        f"Area: {props.get('areaDesc', 'Unknown')}\n"
        f"Severity: {props.get('severity', 'Unknown')}\n"
        f"Description: {props.get('description', 'No description available')}\n"
        f"Instructions: {props.get('instruction', 'No specific instructions provided')}"
    )

# Instantiate FastMCP and register tools via decorators.
mcp = FastMCP("weather", stateless_http=True)

@mcp.tool()
async def get_alerts(state: str) -> str:
    """Fetch active alerts for a given state code (e.g., 'CA')."""
    url = f"{NWS_API_BASE}/alerts/active/area/{state}"
    data = await make_nws_request(url)
    if not data or "features" not in data:
        return "Unable to fetch alerts or no alerts found."
    features = data["features"]
    if not features:
        return "No active alerts for this state."
    return "\n---\n".join(format_alert(f) for f in features)

@mcp.tool()
async def get_forecast(latitude: float, longitude: float) -> str:
    """Fetch a 5-period weather forecast for given lat/lon."""
    points_url = f"{NWS_API_BASE}/points/{latitude},{longitude}"
    points_data = await make_nws_request(points_url)
    if not points_data or "properties" not in points_data:
        return "Unable to fetch forecast data for this location."

    forecast_url = points_data["properties"].get("forecast")
    if not forecast_url:
        return "No forecast URL found for this location."

    forecast_data = await make_nws_request(forecast_url)
    if not forecast_data or "properties" not in forecast_data:
        return "Unable to fetch detailed forecast."

    periods = forecast_data["properties"].get("periods", [])
    if not periods:
        return "No forecast periods available."

    parts: list[str] = []
    for p in periods[:5]:
        parts.append(
            f"{p['name']}:\nTemperature: {p['temperature']}°{p['temperatureUnit']}\n" +
            f"Wind: {p['windSpeed']} {p['windDirection']}\n" +
            f"Forecast: {p['detailedForecast']}"
        )
    return "\n---\n".join(parts)

## FastAPI app and Ray Serve setup.
@asynccontextmanager
async def lifespan(app: FastAPI):
    # 1) Mount the MCP app.
    app.mount("/", mcp.streamable_http_app())

    # 2) Enter the session_manager's context.
    async with mcp.session_manager.run():
        yield

fastapi_app = FastAPI(lifespan=lifespan)

@serve.deployment(
    autoscaling_config={
        "min_replicas": 1,
        "max_replicas": 20,
        "target_ongoing_requests": 5
        },
    ray_actor_options={"num_cpus": 0.2}
)
@serve.ingress(fastapi_app)
class WeatherMCP:
    def __init__(self):
        pass


# Ray Serve entry point.
app = WeatherMCP.bind()
2. Run Ray Serve in the terminal#
serve run weather_mcp_ray:app
3. Test with a Python client#
import asyncio
import httpx
from mcp.client.streamable_http import streamablehttp_client
from mcp import ClientSession

BASE_URL = "http://localhost:8000"
STREAM_URL = f"{BASE_URL}/mcp"

async def main() -> None:
    async with streamablehttp_client(STREAM_URL) as (r, w, _):
        async with ClientSession(r, w) as session:
            await session.initialize()

            tools = await session.list_tools()
            print("Available tools:")
            for t in tools.tools:
                print(f"  • {t.name}: {t.description}")
            print()

            alerts = await session.call_tool(
                name="get_alerts", arguments={"state": "CA"}
            )
            print("=== Active Alerts for CA ===")
            print(alerts.content[0].text)
            print()

            forecast = await session.call_tool(
                name="get_forecast",
                arguments={"latitude": 34.05, "longitude": -118.24},
            )
            print("=== 5-Period Forecast for LA ===")
            print(forecast.content[0].text)
            print()


# ──────── How to run in Jupyter Notebook ────────────────────────────
# await main()
# ────────────────────────────────────────────────────────────────────


# ──────── How to run as a standalone Python script ──────────────────
# import asyncio
#
# if __name__ == "__main__":
#     # Create and run the event loop
#     asyncio.run(main())
# ────────────────────────────────────────────────────────────────────
To terminate Ray serve:#
serve shutdown --yes
4. Production deployment with Anyscale service#
For production deployment, use Anyscale services to deploy the Ray Serve app to a dedicated cluster without modifying the code. Anyscale ensures scalability, fault tolerance, and load balancing, keeping the service resilient against node failures, high traffic, and rolling updates.
Use the following command to deploy the service:
anyscale service deploy weather_mcp_ray:app --name=weather_mcp_service
5. Query the production service#
When you deploy, you expose the service to a publicly accessible IP address, which you can send requests to.
In the preceding cell’s output, copy your API_KEY and BASE_URL. As an example, the values look like the following:
BASE_URL = “https://multi-mcp-tool-service-jgz99.cld-kvedzwag2qa8i5bj.s.anyscaleuserdata.com”
TOKEN = “z3RIKzZwHDF9sV60o7M48WsOY1Z50dsXDrWRbxHYtPQ”
Fill in the following placeholder values for the BASE_URL and API_KEY in the following Python requests object:
import asyncio
import httpx
from mcp.client.streamable_http import streamablehttp_client
from mcp import ClientSession

BASE_URL = "https://weather-mcp-service-jgz99.cld-kvedzwag2qa8i5bj.s.anyscaleuserdata.com" # Replace with your own URL
TOKEN = "SonDp89sqyElLcVX1SLcMu1qeVfqyVOpfKjL7D0vjrM" # Replace with your token
STREAM_URL = f"{BASE_URL}/mcp"

# # Common headers for auth.
headers = {
    "Authorization": f"Bearer {TOKEN}"
}

async def main() -> None:

    # Pass the headers into the HTTP client so the server sees a valid JSON-RPC + SSE handshake.
    async with streamablehttp_client(STREAM_URL, headers=headers) as (r, w, _):
        async with ClientSession(r, w) as session:
            # This now sends the JSON-RPC "initialize" under the hood.
            await session.initialize()

            tools = await session.list_tools()
            print("Available tools:")
            for t in tools.tools:
                print(f"  • {t.name}: {t.description}")
            print()

            alerts = await session.call_tool(
                name="get_alerts", arguments={"state": "CA"}
            )
            print("=== Active Alerts for CA ===")
            print(alerts.content[0].text)
            print()

            forecast = await session.call_tool(
                name="get_forecast",
                arguments={"latitude": 34.05, "longitude": -118.24},
            )
            print("=== 5-Period Forecast for LA ===")
            print(forecast.content[0].text)
            print()

# ──────── How to run in Jupyter Notebook ────────────────────────────
# await main()
# ────────────────────────────────────────────────────────────────────


# ──────── How to run as a standalone Python script ──────────────────
# import asyncio
#
# if __name__ == "__main__":
#     # Create and run the event loop
#     asyncio.run(main())
# ────────────────────────────────────────────────────────────────────
6. Test the service with MCP inspector#
The MCP inspector is a developer tool for testing and debugging MCP servers: https://github.com/modelcontextprotocol/inspector.
On your local machine#
Install Node.js and NPM: https://nodejs.org/en/download
Launch the MCP Inspector. Make sure your MCP inspector version is = 0.16.1:
npx -y @modelcontextprotocol/inspector@0.16.1
You should see the message: 🔍 MCP Inspector is up and running at http://127.0.0.1:6274.
Then open the link “http://127.0.0.1:6274” and configure the following:
Transport Type: Streamable HTTP
URL: https://weather-mcp-service-jgz99.cld-kvedzwag2qa8i5bj.s.anyscaleuserdata.com/mcp
Bearer Token: SonDp89sqyElLcVX1SLcMu1qeVfqyVOpfKjL7D0vjrM
Note:
Include the “/mcp” in your URL, otherwise the connection fails.
After MCP Inspector is up and running, you would receive the message such as: “http://localhost:6274/?MCP_PROXY_AUTH_TOKEN=f8c738c6788295b7d71831ac89f64faea2659af8b4f460038b4c6156ee8e72fd” You need to enter the Proxy Session Token in the MCP inspector as well. Otherwise you would encounter error “Proxy Authentication Required”.
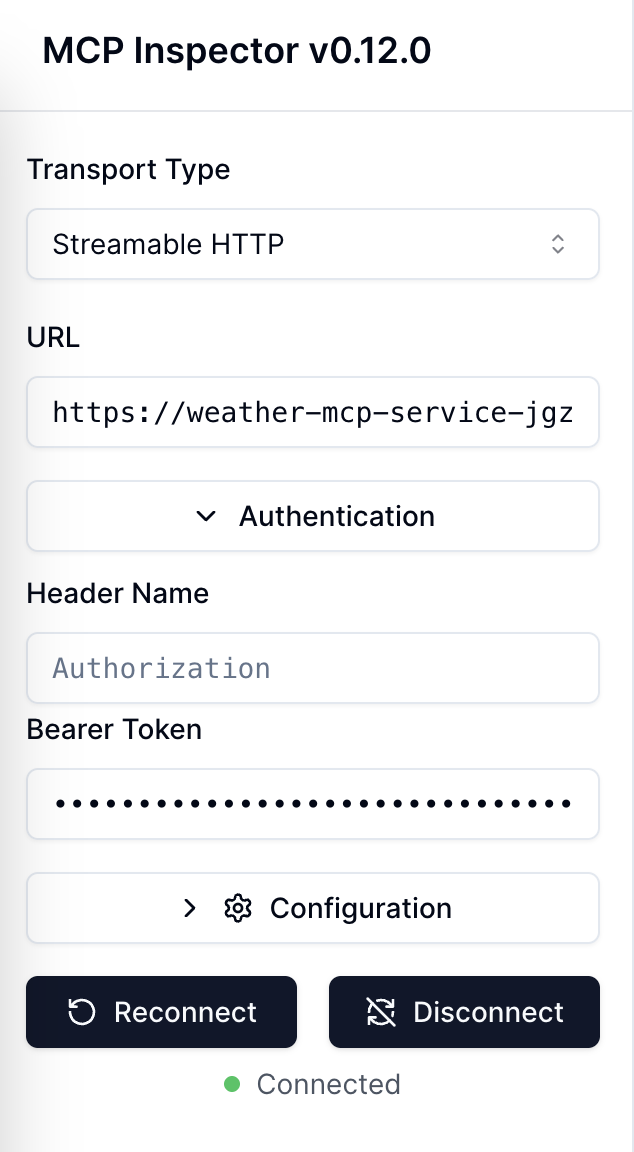
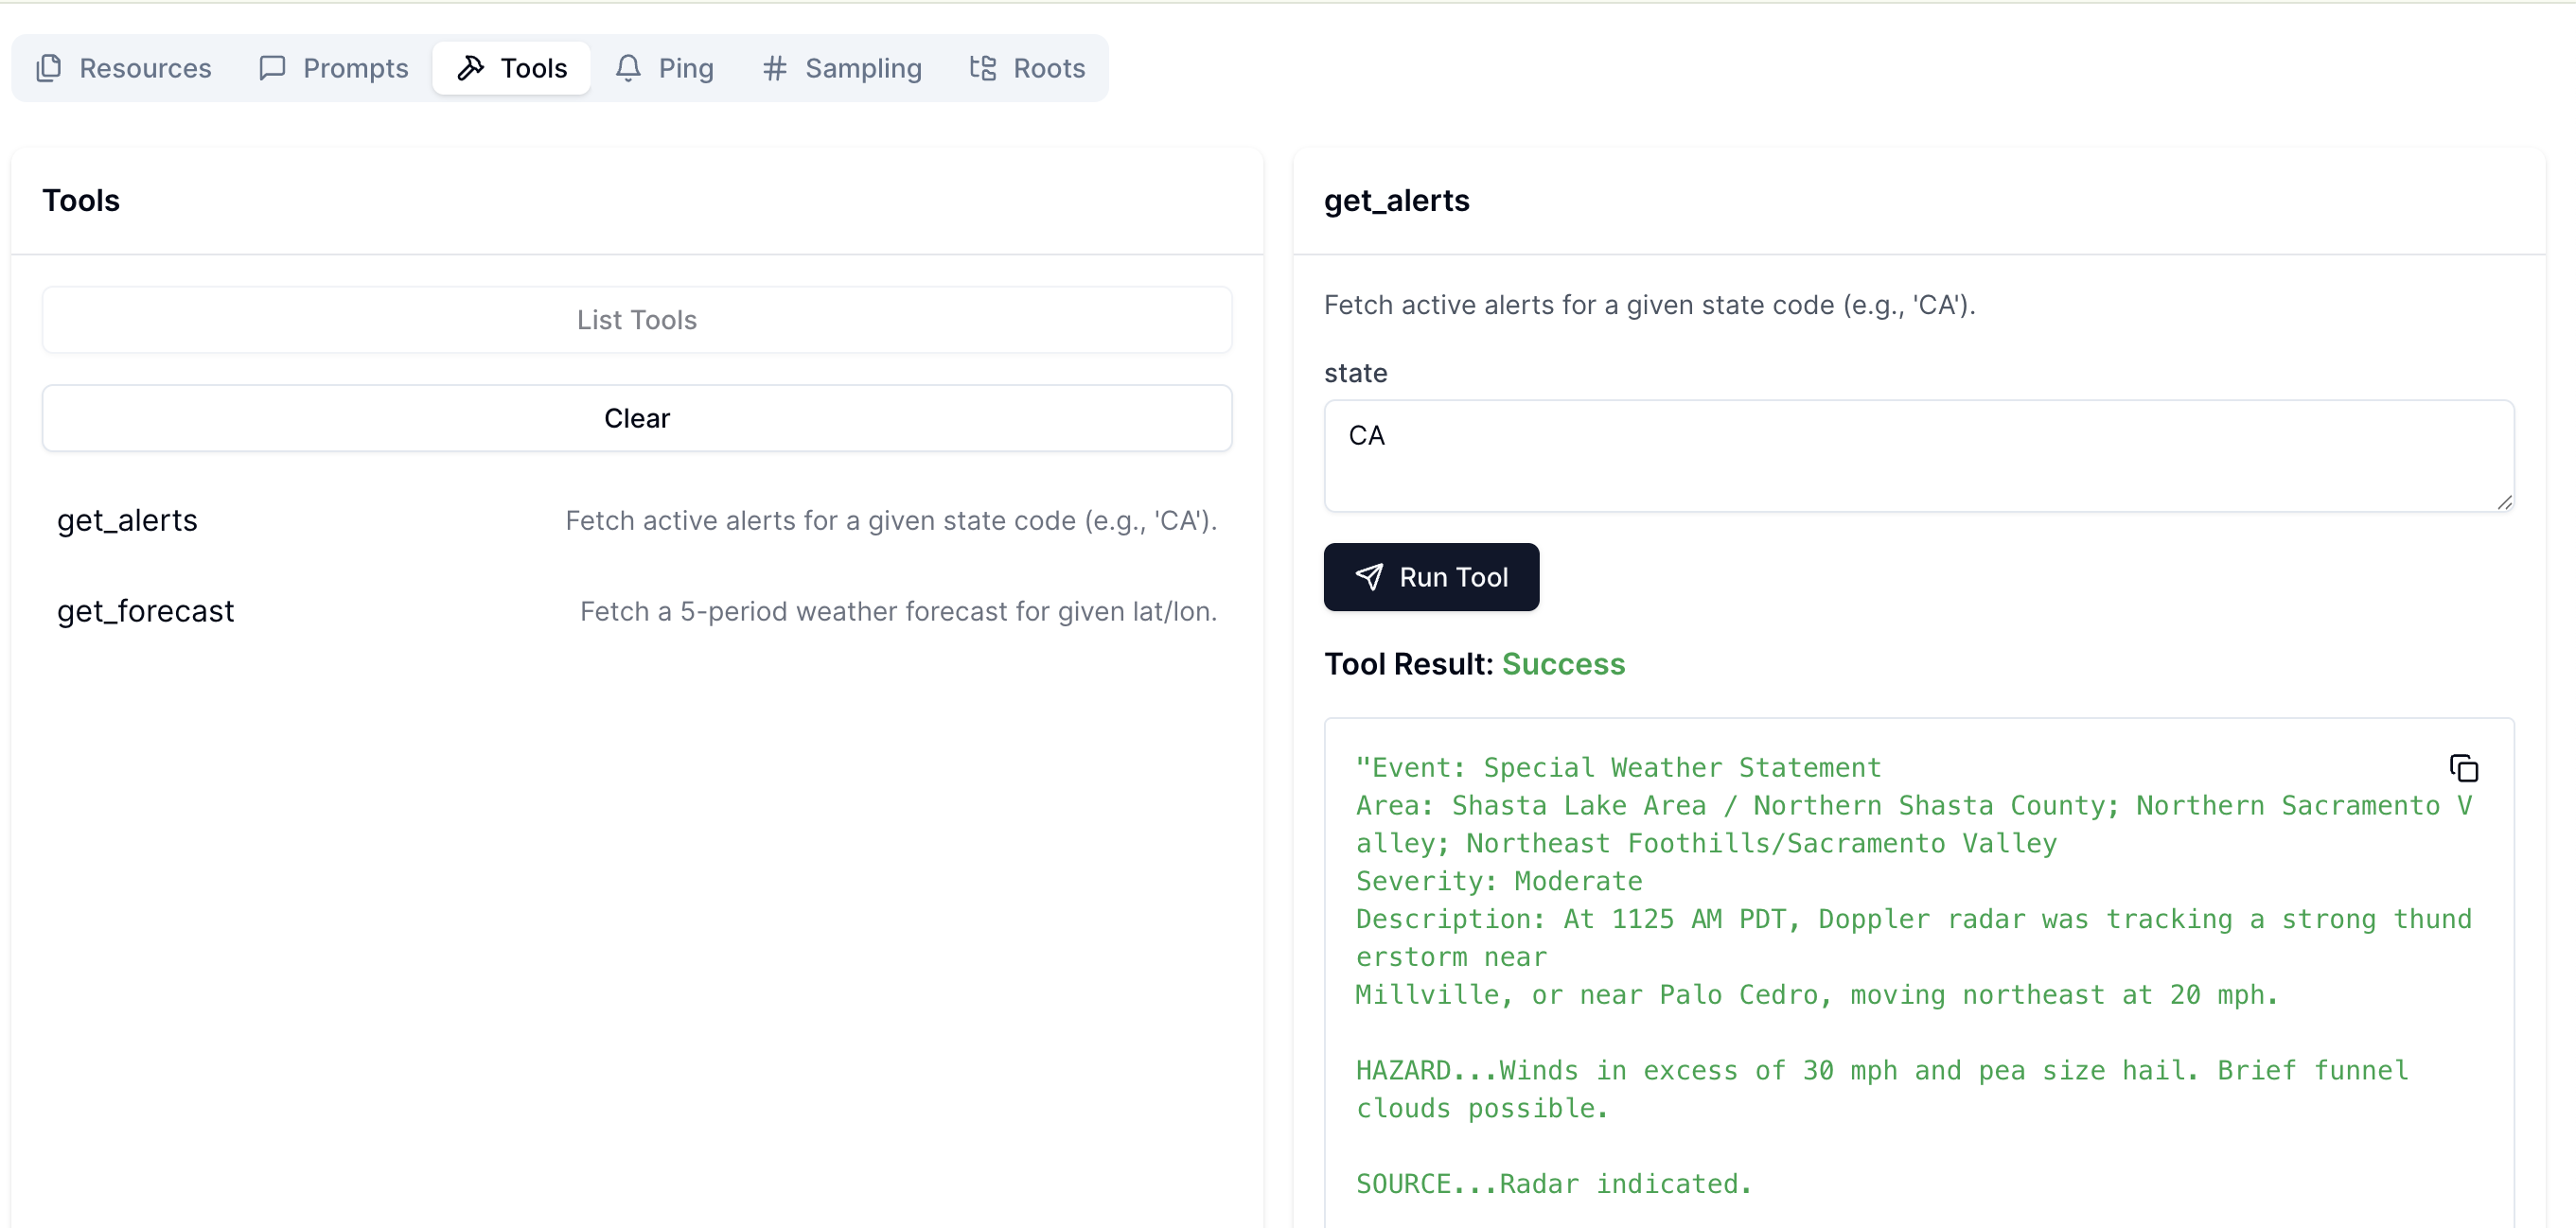
You can see that it’s connected. Then, go to Tools and click List Tools, to see that two tools are available.
After that, you can select a tool and test it. Once you click Run Tool, you see the Tool Result.
7. Terminate the Anyscale Service#
After testing the service, you can shutdown the serive with this command:
anyscale service terminate --name=weather_mcp_service
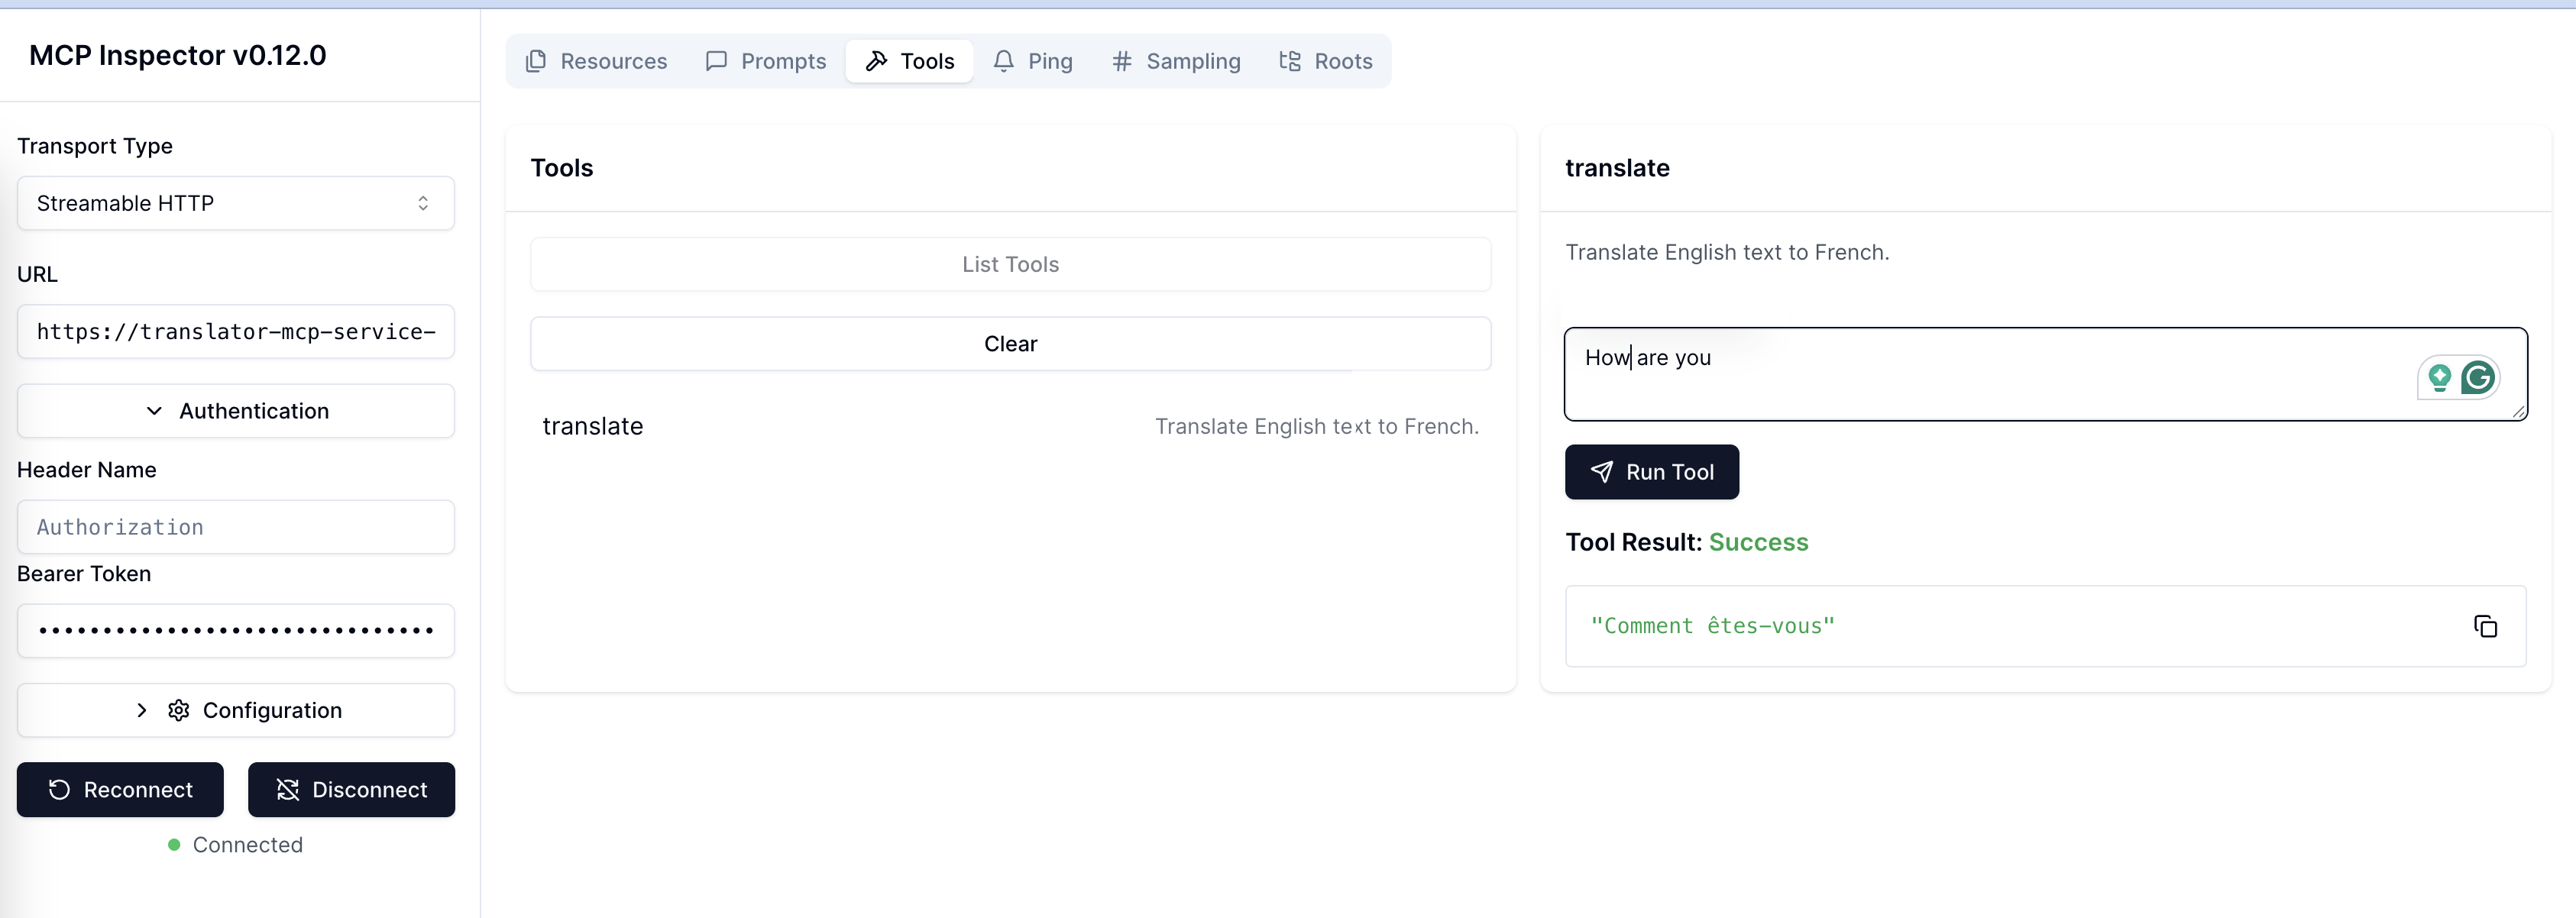
8. Try it yourself with a translator MCP example with Ray Serve using GPU#
Run the following code to deploy your own service using fractional GPUs and verify it with the MCP Inspector.
Here is the code from translator_mcp_ray.py:
import asyncio
from fastapi import FastAPI
from mcp.server.fastmcp import FastMCP
from contextlib import asynccontextmanager
from ray import serve
from transformers import pipeline

# ---------------------------------------------------------------------
# 1. FastMCP business logic for translation
# ---------------------------------------------------------------------
mcp = FastMCP("translator", stateless_http=True)

# Pre-load the translation model (English → French).
translator_pipeline = pipeline("translation_en_to_fr", model="t5-small")

@mcp.tool()
async def translate(text: str) -> str:
    """Translate English text to French."""
    loop = asyncio.get_event_loop()
    # Offload the sync pipeline call to a thread to avoid blocking the event loop.
    result = await loop.run_in_executor(None, translator_pipeline, text)
    return result[0]["translation_text"]


## FastAPI app and Ray Serve setup.
@asynccontextmanager
async def lifespan(app: FastAPI):
    # 1) Mount the MCP app.
    app.mount("/", mcp.streamable_http_app())

    # 2) Enter the session_manager's context.
    async with mcp.session_manager.run():
        yield

fastapi_app = FastAPI(lifespan=lifespan)

@serve.deployment(
    autoscaling_config={
        "min_replicas": 2,
        "max_replicas": 20,
        "target_ongoing_requests": 10
    },
    ray_actor_options={"num_gpus": 0.5,
    'runtime_env':{
        "pip": [
            "transformers",
            "torch"
        ]
    }}
)
@serve.ingress(fastapi_app)
class TranslatorMCP:
    def __init__(self):
        pass


# Ray Serve entry point.
app = TranslatorMCP.bind()
If successful, you see the Tool Result similar to the image below: