Deploying an MCP STDIO Server as a scalable HTTP service with Ray Serve#
Deploying an existing MCP as a HTTP Service with Ray Serve, as shown in the tutorial, can make your service more reliable and easier to scale. This approach is beneficial for the following reasons:
Addressing MCP stdio Mode limitations#
MCP in stdio mode, which uses standard input/output streams, is typically run locally for command-line tools or simple integrations. This makes it difficult to deploy as a service because it relies on local process communication, which isn’t suitable for distributed or cloud environments.
Many of the official Docker images on the “shelf” default to stdio mode, making them incompatible with remote servers and large-scale deployments. By using Ray Serve, you can expose any stdio-based MCP server as an HTTP service without modifying or rebuilding your existing Docker images. This approach delivers several key benefits:
No code changes or image rebuilds: You don’t have to rewrite your MCP server or rebuild its Docker images—Ray Serve wraps the existing container and handles the transport layer for you.
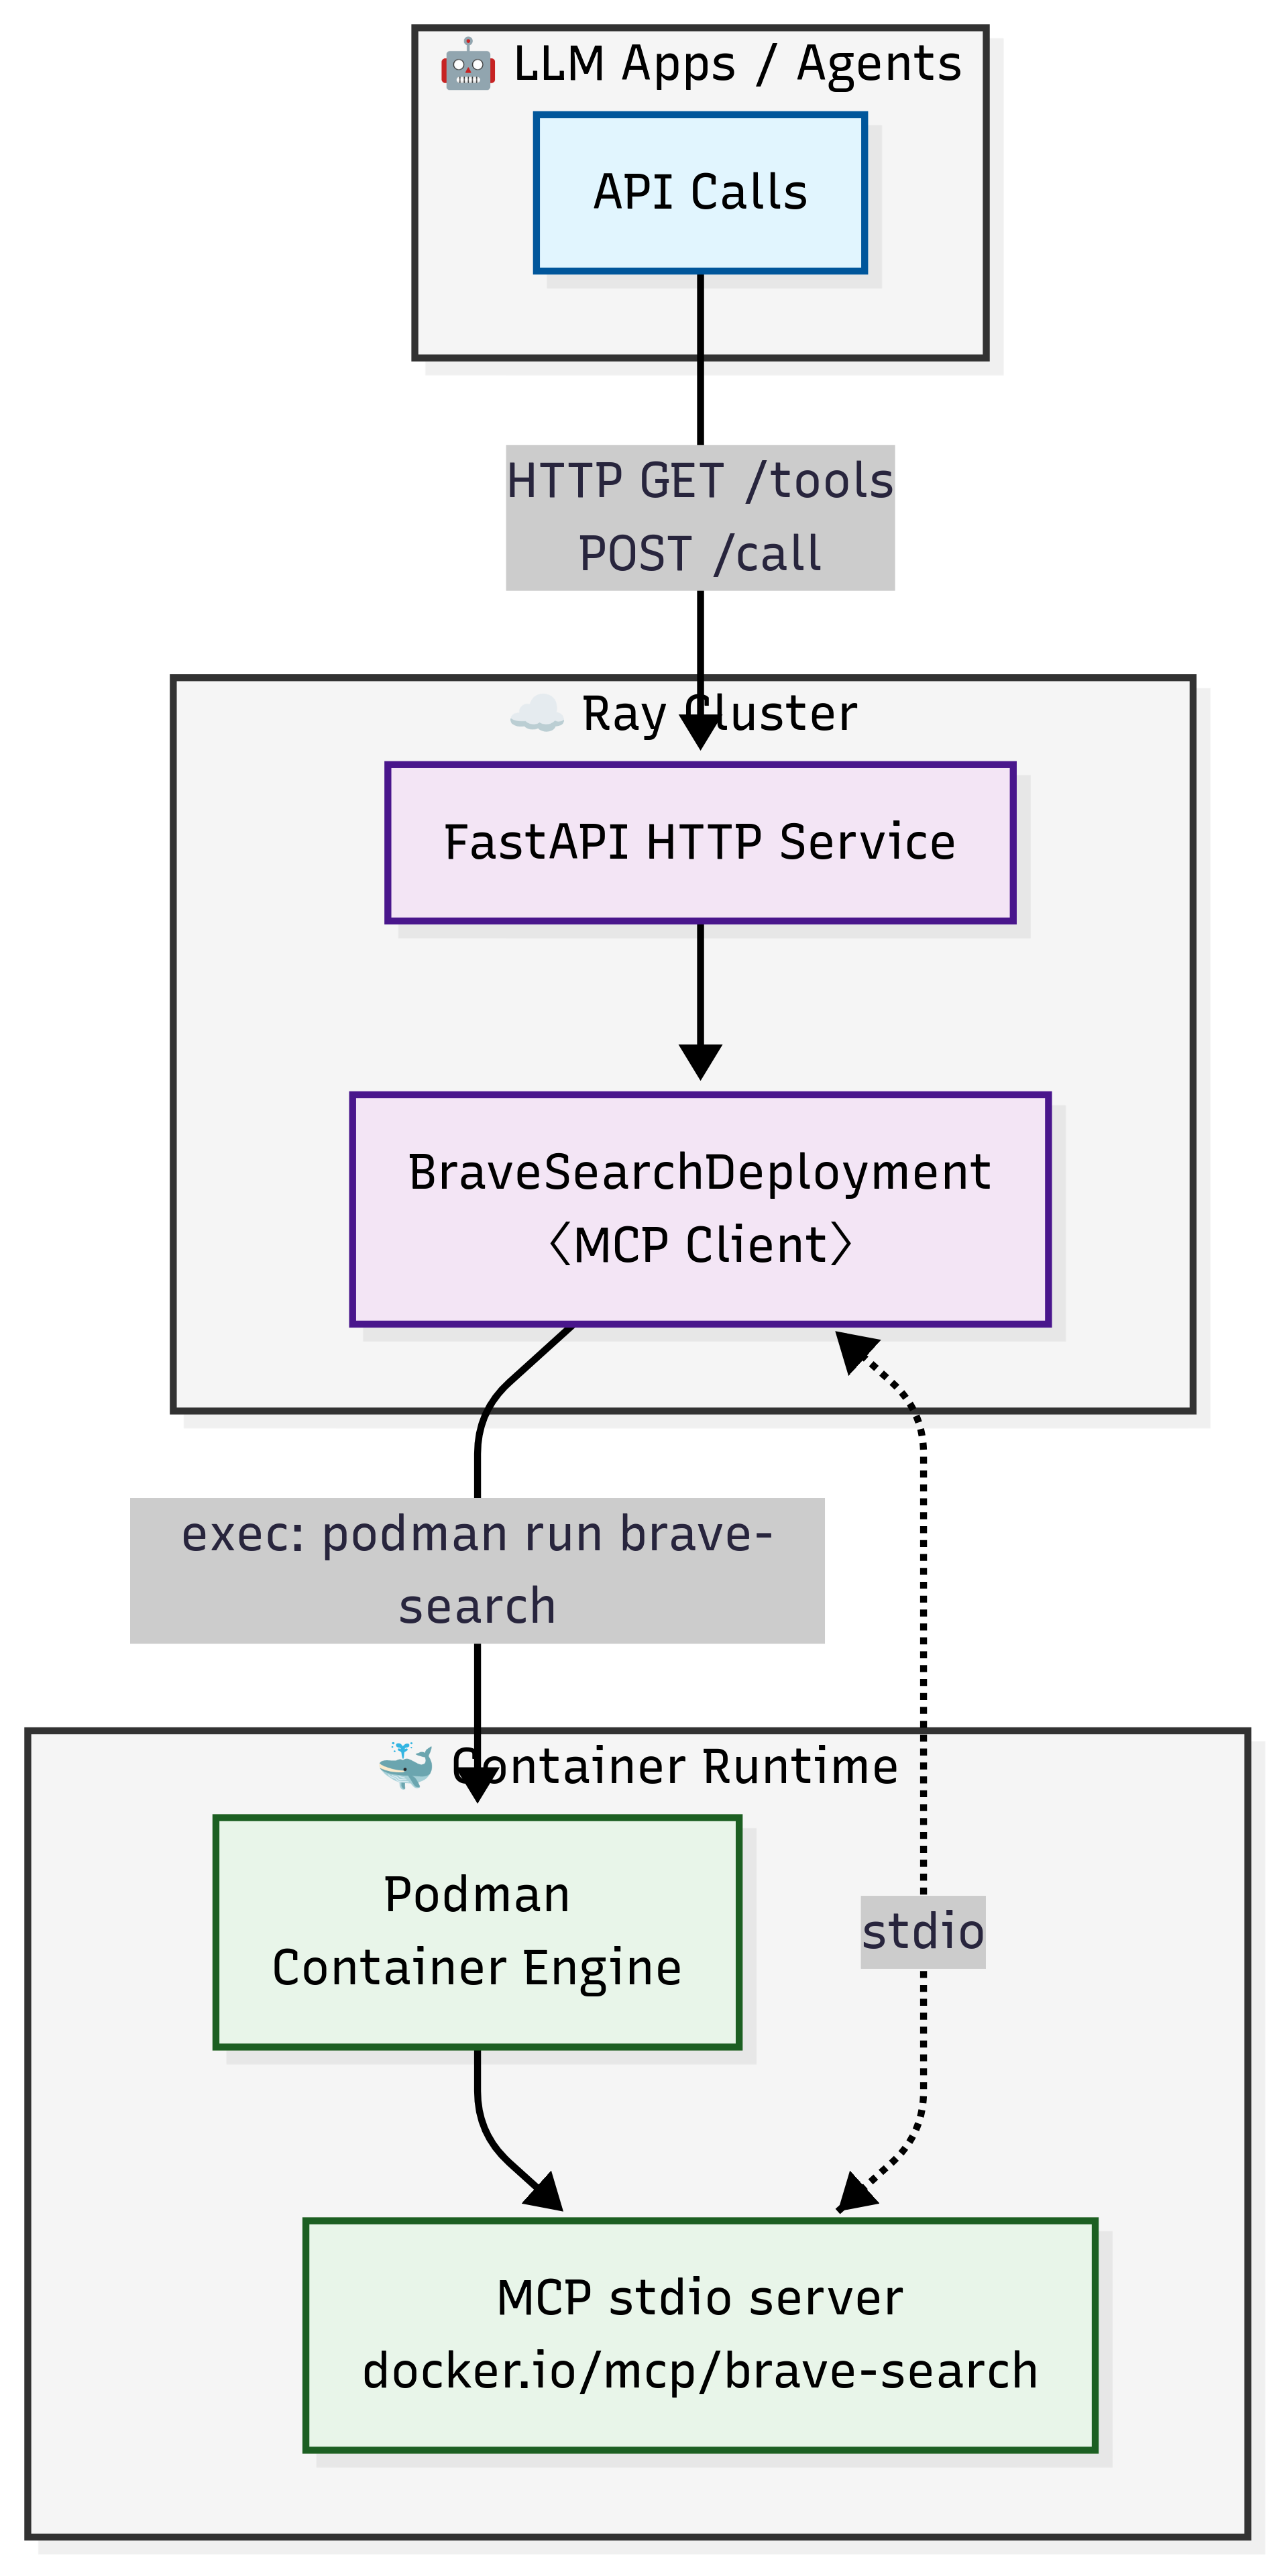
Automatic tool discovery: Retrieve a list of available tools via a simple HTTP GET to the /tools endpoint—no custom scripting required.
Standardized HTTP API: Invoke any tool by POSTing to the /call endpoint, passing the tool name and parameters in JSON.
Cloud-native scalability: Deploy behind load balancers, autoscale horizontally, and integrate with service meshes or API gateways as you would with any other HTTP microservice.
By translating stdio-mode MCP servers into HTTP endpoints with Ray Serve, you gain the flexibility and reliability needed for production-grade deployments—without touching your existing codebase. The following architecture diagram illustrates deploying a MCP Docker image with Ray Serve:
Benefits of Ray Serve deployment on Anyscale#
Converting MCP to a HTTP service using Ray Serve, as shown in the tutorial, addresses the deployment challenges of stdio mode. It makes the service easier to manage and deploy, especially in production, with additional features:
Ray Serve capabilities:
Autoscaling: Ray Serve automatically adjusts the number of replicas based on traffic demand, ensuring your service handles increased load while maintaining responsiveness during peak usage periods.
Load balancing: Ray Serve intelligently distributes incoming requests across available replicas, preventing any single instance from becoming overwhelmed and maintaining consistent performance.
Observability: Built-in monitoring capabilities provide visibility into your service’s performance, including request metrics, resource utilization, and system health indicators.
Fault tolerance: Ray Serve automatically detects and recovers from failures by restarting failed components and redistributing requests to healthy replicas, ensuring continuous service availability.
Anyscale service additional benefits:
Production ready: Anyscale provides enterprise-grade infrastructure management and automated deployments that make your MCP service ready for real-world production traffic.
High availability: Advanced availability zone aware scheduling mechanisms and zero-downtime rolling updates to ensure your service maintains high availability.
Logging and Tracing: Enhanced observability with comprehensive logging, distributed tracing, and real-time monitoring dashboards that provide deep insights into request flows and system performance.
Head node fault tolerance: Additional resilience through managed head node redundancy, protecting against single points of failure in your Ray cluster’s coordination layer.
Composition: Build complex services by orchestrating multiple deployments into a single pipeline, allowing you to chain preprocessing, model inference, postprocessing, and custom logic seamlessly.
Note:
If you want to use off-the-shelf MCP Docker images to deploy a scalable MCP service, this tutorial still works. However, with this approach you need to build some custom code in your agent to list and call the tools properly.
For deeper integrations with Ray Serve using your own custom MCP tools, you can also use MCP in Streamable HTTP mode with Ray Serve. See Notebook #1 and #2 for that approach. This allows you directly integrate Claude with remote MCP servers.
Prerequisites#
Ray [Serve], already included in the base Docker image
Podman
A Brave API key set in your environment (
BRAVE_API_KEY)MCP Python library
Dependencies#
Build Docker image for Ray Serve deployment
In this tutorial you need to build a Docker image for deployment on Anyscale using the Dockerfile included in this code repo.
The reason is that when you run apt-get install -y podman (e.g. installing a system package) from the workspace terminal, it only lives in the Ray head node and is not propagated to your Ray worker nodes.
After building the Docker image, navigate to the Dependencies tab in Workspaces and select the corresponding image you just created, and set the BRAVE_API_KEY environment variable.
Note
This Docker image is provided solely to deploy the MCP with Ray Serve. Ensure that your MCP docker images, like docker.io/mcp/brave-search, are already published to your own private registry or public registry.
Common issues#
FileNotFoundError: [Errno 2] No such file or directory
Usually indicates Podman isn’t installed correctly. Verify the Podman installation.
KeyError: ‘BRAVE_API_KEY’
Ensure you have exported BRAVE_API_KEY in your environment or included it in your dependency configuration.
1. Create the deployment file#
Save the following code as brave_mcp_ray_serve.py. This script defines a Ray Serve deployment that proxies requests to the MCP Brave Search server with Podman:
import os
import asyncio
import logging
from contextlib import AsyncExitStack
from typing import Any, Dict, List

from fastapi import FastAPI, Request, HTTPException
from ray import serve

from mcp import ClientSession, StdioServerParameters
from mcp.client.stdio import stdio_client

app = FastAPI()
logger = logging.getLogger("MCPDeployment")


@serve.deployment(num_replicas=3, ray_actor_options={"num_cpus": 0.5})
@serve.ingress(app)
class BraveSearchDeployment:
    """MCP deployment that exposes every tool provided by its server.

    * **GET  /tools** - list tools (name, description, and input schema)
    * **POST /call** - invoke a tool

      ```json
      {
        "tool_name": "<name>",   // optional - defaults to brave_web_search
        "tool_args": { ... }      // **required** - arguments for the tool
      }
      ```
    """

    DEFAULT_TOOL = "brave_web_search"

    def __init__(self) -> None:
        self._init_task = asyncio.create_task(self._initialize())

    # ------------------------------------------------------------------ #
    # 1. Start podman + MCP session
    # ------------------------------------------------------------------ #
    async def _initialize(self) -> None:
        params = StdioServerParameters(
            command="podman",
            args=[
                "run",
                "-i",
                "--rm",
                "-e",
                f"BRAVE_API_KEY={os.environ['BRAVE_API_KEY']}",
                "docker.io/mcp/brave-search",
            ],
            env=os.environ.copy(),
        )

        self._exit_stack = AsyncExitStack()

        stdin, stdout = await self._exit_stack.enter_async_context(stdio_client(params))

        self.session: ClientSession = await self._exit_stack.enter_async_context(ClientSession(stdin, stdout))
        await self.session.initialize()

        logger.info("BraveSearchDeployment replica ready.")

    async def _ensure_ready(self) -> None:
        """Block until _initialize finishes (and surface its errors)."""
        await self._init_task

    # ------------------------------------------------------------------ #
    # 2. Internal helper: list tools
    # ------------------------------------------------------------------ #
    async def _list_tools(self) -> List[Dict[str, Any]]:
        await self._ensure_ready()
        resp = await self.session.list_tools()
        return [
            {
                "name": tool.name,
                "description": tool.description,
                "input_schema": tool.inputSchema,
            }
            for tool in resp.tools
        ]

    # ------------------------------------------------------------------ #
    # 3. HTTP endpoints
    # ------------------------------------------------------------------ #
    @app.get("/tools")
    async def tools(self):
        """Return all tools exposed by the backing MCP server."""
        return {"tools": await self._list_tools()}

    @app.post("/call")
    async def call_tool(self, request: Request):
        """Generic endpoint to invoke any tool exposed by the server."""
        body = await request.json()

        tool_name: str = body.get("tool_name", self.DEFAULT_TOOL)
        tool_args: Dict[str, Any] | None = body.get("tool_args")

        if tool_args is None:
            raise HTTPException(400, "must include 'tool_args'")

        await self._ensure_ready()

        try:
            result = await self.session.call_tool(tool_name, tool_args)
            return {"result": result}
        except Exception as exc:
            logger.exception("MCP tool call failed")
            raise HTTPException(500, "Tool execution error") from exc

    # ------------------------------------------------------------------ #
    # 4. Tidy shutdown
    # ------------------------------------------------------------------ #
    async def __del__(self):
        if hasattr(self, "_exit_stack"):
            await self._exit_stack.aclose()


# Entry-point object for `serve run …`
brave_search_tool = BraveSearchDeployment.bind()
Note:
In the Ray cluster, use Podman instead of Docker to run and manage containers. This approach aligns with the guidelines provided in the Ray Serve multi-app container deployment documentation.
Additionally, for images such as
"docker.io/mcp/brave-search", explicitly include the"docker.io/"prefix to ensure Podman correctly identifies the image URI.Set the
@serve.deployment(num_replicas=3, ray_actor_options={"num_cpus": 0.5})as an example. For more details to configure Ray Serve deployments, see https://docs.ray.io/en/latest/serve/configure-serve-deployment.html.
2. Run the service with Ray Serve in the workspace#
You can run the following command in the terminal to deploy the service using Ray Serve:
serve run brave_mcp_ray_serve:brave_search_tool
This starts the service on http://localhost:8000.
3. Test the service#
List available tools
import httpx, asyncio
from pprint import pprint
import requests

BASE_URL = "http://localhost:8000"

response = requests.get(f"{BASE_URL}/tools", timeout=10)
response.raise_for_status()
tools = response.json()
pprint(tools)
Invoke the Brave Web Search tool:
# Invoke the brave_web_search tool
query = "best tacos in Los Angeles"
payload = {"tool_name": "brave_web_search", "tool_args": {"query": query}}
resp = requests.post(f"{BASE_URL}/call", json=payload)
print(f"\n\nQuery:{query}")
print("\n\nResults:\n\n")
pprint(resp.json())
4. Production deployment with Anyscale service#
For production deployment, use Anyscale Services to deploy the Ray Serve app to a dedicated cluster without modifying the code. Anyscale ensures scalability, fault tolerance, and load balancing, keeping the service resilient against node failures, high traffic, and rolling updates.
Use the following command to deploy the service:
anyscale service deploy brave_mcp_ray_serve:brave_search_tool --name=brave_search_tool_service
Note:
This Anyscale service pulls the associated dependencies, compute config, and service config from the workspace. To define these explicitly, you can deploy from a config.yaml file using the -f flag. See ServiceConfig reference for details.
5. Query the production service#
When you deploy, you expose the service to a publicly accessible IP address, which you can send requests to.
In the preceding cell’s output, copy your API_KEY and BASE_URL. As an example, the values look like the following:
BASE_URL: https://brave-search-tool-service-jgz99.cld-kvedzwag2qa8i5bj.s.anyscaleuserdata.com
TOKEN: yW2n0QPjUyUfyS6W6rIRIoEfFr80-JjXmnoEQGbTe7E
Fill in the following placeholder values for the BASE_URL and API_KEY in the following Python requests object:
import httpx
import asyncio
from pprint import pprint
import requests

# Service specific config.
BASE_URL = "https://brave-search-tool-service-jgz99.cld-kvedzwag2qa8i5bj.s.anyscaleuserdata.com" # Replace with your own URL
TOKEN = "yW2n0QPjUyUfyS6W6rIRIoEfFr80-JjXmnoEQGbTe7E" # Replace with your own token

# Prepare the auth header.
HEADERS = {
    "Authorization": f"Bearer {TOKEN}"
}

# List tools.
resp = requests.get(f"{BASE_URL}/tools", headers=HEADERS)
resp.raise_for_status()
print("Tools:\n\n")
pprint(resp.json())

# Invoke search.
query = "best tacos in Los Angeles"
payload = {"tool_name": "brave_web_search", "tool_args": {"query": query}}
resp = requests.post(f"{BASE_URL}/call", json=payload, headers=HEADERS)
print(f"\n\nQuery:{query}")
print("\n\nResults:\n\n")
pprint(resp.json())