Deploy an MCP Gateway with existing Ray Serve apps#
This guide shows how to put a front-end on your existing Ray Serve services with a single MCP gateway—no code changes required in your classifier or translator. This guide follows this multi-app deployment pattern: https://docs.ray.io/en/latest/serve/multi-app.html.
Why MCP Gateway on Anyscale?#
If you already have Ray Serve services running on Anyscale (or your own cluster), you can front‐end them with a single MCP Gateway without touching the code. Just write one new mcp_gateway.py, regenerate your config.yaml, and an Anyscale service automatically spins up:
Independent scaling for each Serve app: Each app keeps its own autoscaling, load balancing, CPU/GPU settings, etc.
A unified, streamable HTTP endpoint (/mcp) that multiplexes calls
No need to merge codebases: Your classifier still lives in
image_classifier.py, translator intext_translator.py; MCP gateway sits in front.
The following is the architecture diagram illustrating the MCP Gateway with Ray Serve and Anyscale service:

Prerequisites#
Ray [serve], included in the base Docker image
MCP Python library
Dependencies#
Install the required Python packages and Podman:
pip install mcp==1.11.0 asyncio==3.4.3 pydantic==2.9.2
Alternative: Docker image for Ray Serve deployment
You can also build a Docker image for deployment on Anyscale using the Dockerfile included in this code repo.
Note This Docker image is provided solely to deploy the MCP with Ray Serve.
1. Integrate with existing Ray Serve apps#
Assume you already have two Ray Serve services: an image classifier and a text translator. Both code files live in the mcp-gateway-with-existing-ray-apps folder:
Now, create a new file named mcp_gateway.py that uses FastMCP to bridge between these services.
In that file, you can retrieve the image‐classifier handle:
clf = serve.get_deployment_handle("image_classifier", app_name="image_classifier_app")
Ensure that in your Serve config you name the deployment image_classifier and the application image_classifier_app.
Similarly, you can retrieve the text-translator handle as follows:
tr = serve.get_deployment_handle("text_translator", app_name="text_translator_app")
Ensure that in your Serve config you name the deployment text_translator and the application text_translator_app.
The config details are in the next step.
from contextlib import asynccontextmanager
import fastapi
from ray import serve
from mcp.server.fastmcp import FastMCP

# --------------------------------------------------------------------------
# 1.  Create FastMCP in stateless http (streamable) mode
# --------------------------------------------------------------------------
mcp = FastMCP("Image-N-Translate", stateless_http=True)

# --------------------------------------------------------------------------
# 2.  Register your tools BEFORE mounting the app
# --------------------------------------------------------------------------

@mcp.tool()
async def classify(image_url: str) -> str:
    """Return the top-1 label for an image URL."""
    clf = serve.get_deployment_handle("image_classifier", app_name="image_classifier_app")
    return await clf.classify.remote(image_url)

@mcp.tool()
async def translate(text: str) -> str:
    """Translate English → French."""
    tr  = serve.get_deployment_handle("text_translator", app_name="text_translator_app")
    return await tr.translate.remote(text)


# ----------------------------------------------------------------------------
# 3.  Build FastAPI app with lifespan to mount the FastMCP streamable HTTP app
# ----------------------------------------------------------------------------
@asynccontextmanager
async def lifespan(app: fastapi.FastAPI):
    # After startup, mount the streamable-http MCP app.
    app.mount("/", mcp.streamable_http_app())

    # Keep MCP’s session manager running for the lifetime of this process.
    async with mcp.session_manager.run():
        yield

api = fastapi.FastAPI(lifespan=lifespan)

# --------------------------------------------------------------------------
# 4.  Wrap in a Ray Serve deployment
# --------------------------------------------------------------------------
@serve.deployment(
    autoscaling_config={
        "min_replicas": 2,
        "max_replicas": 10,
        "target_ongoing_requests": 50,
    },
    ray_actor_options={
        "num_cpus": 0.5
    }
)
@serve.ingress(api)
class MCPGateway:

    def __init__(self):
        pass


# --------------------------------------------------------------------------
# 5.  Expose the Serve app graph
# --------------------------------------------------------------------------
app = MCPGateway.bind()
2. Compile the config file#
Go to the mcp-gateway-with-existing-ray-apps directory containing those 3 Python files and run the following command:
cd mcp-gateway-with-existing-ray-apps
serve build image_classifier:app text_translator:app mcp_gateway:app -o config_serve_temp.yaml
In the config_serve_temp.yaml file, application names are auto-generated by default (e.g., app1, app2, etc.).
However, as noted earlier in the code snippet: clf = serve.get_deployment_handle("image_classifier", app_name="image_classifier_app")
The app_name must match the name specified in the configuration file. Therefore, you need to update the applications section of your YAML file as follows:
applications:
  - name: image_classifier_app
    import_path: image_classifier:app
    route_prefix: /classify
    # …other settings…

  - name: text_translator_app
    import_path: text_translator:app
    route_prefix: /translate
    # …other settings…

  - name: mcp_gateway_app
    import_path: mcp_gateway:app
    route_prefix: /mcp_gateway
    # …other settings…
3. Run the service with Ray Serve in terminal#
We have provied the finalized config_serve.yaml file in the folder mcp-gateway-with-existing-ray-apps/ that include the previous changes, simply run:
serve run config_serve.yaml
4. Test with Python client#
The service starts on the URL http://localhost:8000, because you define the route_prefix: /mcp_gateway on the mcp_gateway_app, therefore, the MCP endpoint becomes http://localhost:8000/mcp_gateway/mcp.
Note that the endpoint URL adds “/mcp” because you have app.mount("/", mcp.streamable_http_app()) in the mcp_gateway.py.
import asyncio
from mcp.client.streamable_http import streamablehttp_client
from mcp import ClientSession

SAMPLE_IMAGE_URL = "https://doggos-dataset.s3.us-west-2.amazonaws.com/samara.png"
SAMPLE_TEXT      = "How are you?"
url = "http://localhost:8000/mcp_gateway/mcp"

async def main():
    async with streamablehttp_client(url=url) as (read, write, _):
        async with ClientSession(read, write) as session:
            await session.initialize()

            # List available tools
            tools = await session.list_tools()
            print("Tools:")
            for t in tools.tools:
                print(f" • {t.name}: {t.description}")
            print()

            # Test calls
            tests = {
                "classify": {"image_url": SAMPLE_IMAGE_URL},
                "translate": {"text": SAMPLE_TEXT},
            }

            for t in tools.tools:
                if t.name in tests:
                    print(f"--- {t.name} ---")
                    res = await session.call_tool(name=t.name, arguments=tests[t.name])
                    for chunk in res.content:
                        print(chunk.text)
                    print()


# ──────── How to run in Jupyter Notebook ────────────────────────────
# await main()
# ────────────────────────────────────────────────────────────────────


# ──────── How to run as a standalone Python script ──────────────────
# import asyncio
#
# if __name__ == "__main__":
#     # Create and run the event loop
#     asyncio.run(main())
# ────────────────────────────────────────────────────────────────────
To terminate Ray serve:#
serve shutdown --yes
5. Production deployment with Anyscale service#
First, copy the config_serve.yaml file to a new file named config_anyscale.yaml. Then, remove the proxy_location, http_options, grpc_options, and logging_config fields. Anyscale services don’t support these fields. You can also add the name field with the value mcp-gateway-app-service to indicate the service name.
For production deployment, use Anyscale services to deploy the Ray Serve app to a dedicated cluster. Anyscale ensures scalability, fault tolerance, and load balancing, keeping the service resilient against node failures, high traffic, and rolling updates.
Use the following command to deploy the service:
anyscale service deploy -f "config_anyscale.yaml"
6. Query the production service#
When you deploy, you expose the service to a publicly accessible IP address, which you can send requests to.
In the preceding cell’s output, copy your API_KEY and BASE_URL. As an example, the values look like the following:
BASE_URL = “https://mcp-gateway-app-service-jgz99.cld-kvedzwag2qa8i5bj.s.anyscaleuserdata.com”
TOKEN = “CCq8xuiXup_tWcyo-CjfcdyMhiTAnCzQkuXChnmnzoc”
Fill in the following placeholder values for the BASE_URL and API_KEY in the following Python requests object:
from mcp.client.streamable_http import streamablehttp_client
from mcp import ClientSession

BASE_URL = "https://mcp-gateway-app-service-jgz99.cld-kvedzwag2qa8i5bj.s.anyscaleuserdata.com" # Replace with your own URL
TOKEN = "CCq8xuiXup_tWcyo-CjfcdyMhiTAnCzQkuXChnmnzoc" # Replace with your own token
url = f"{BASE_URL}/mcp_gateway/mcp"

# # Common headers for auth
headers = {
    "Authorization": f"Bearer {TOKEN}"
}

async def main():
    async with streamablehttp_client(url=url, headers=headers) as (read, write, _):
        async with ClientSession(read, write) as session:
            await session.initialize()

            # List available tools
            tools = await session.list_tools()
            print("Tools:")
            for t in tools.tools:
                print(f" • {t.name}: {t.description}")
            print()

            # Test calls
            tests = {
                "classify": {"image_url": SAMPLE_IMAGE_URL},
                "translate": {"text": SAMPLE_TEXT},
            }

            for t in tools.tools:
                if t.name in tests:
                    print(f"--- {t.name} ---")
                    res = await session.call_tool(name=t.name, arguments=tests[t.name])
                    for chunk in res.content:
                        print(chunk.text)
                    print()

# ──────── How to run in Jupyter Notebook ────────────────────────────
# await main()
# ────────────────────────────────────────────────────────────────────


# ──────── How to run as a standalone Python script ──────────────────
# import asyncio
#
# if __name__ == "__main__":
#     # Create and run the event loop
#     asyncio.run(main())
# ────────────────────────────────────────────────────────────────────
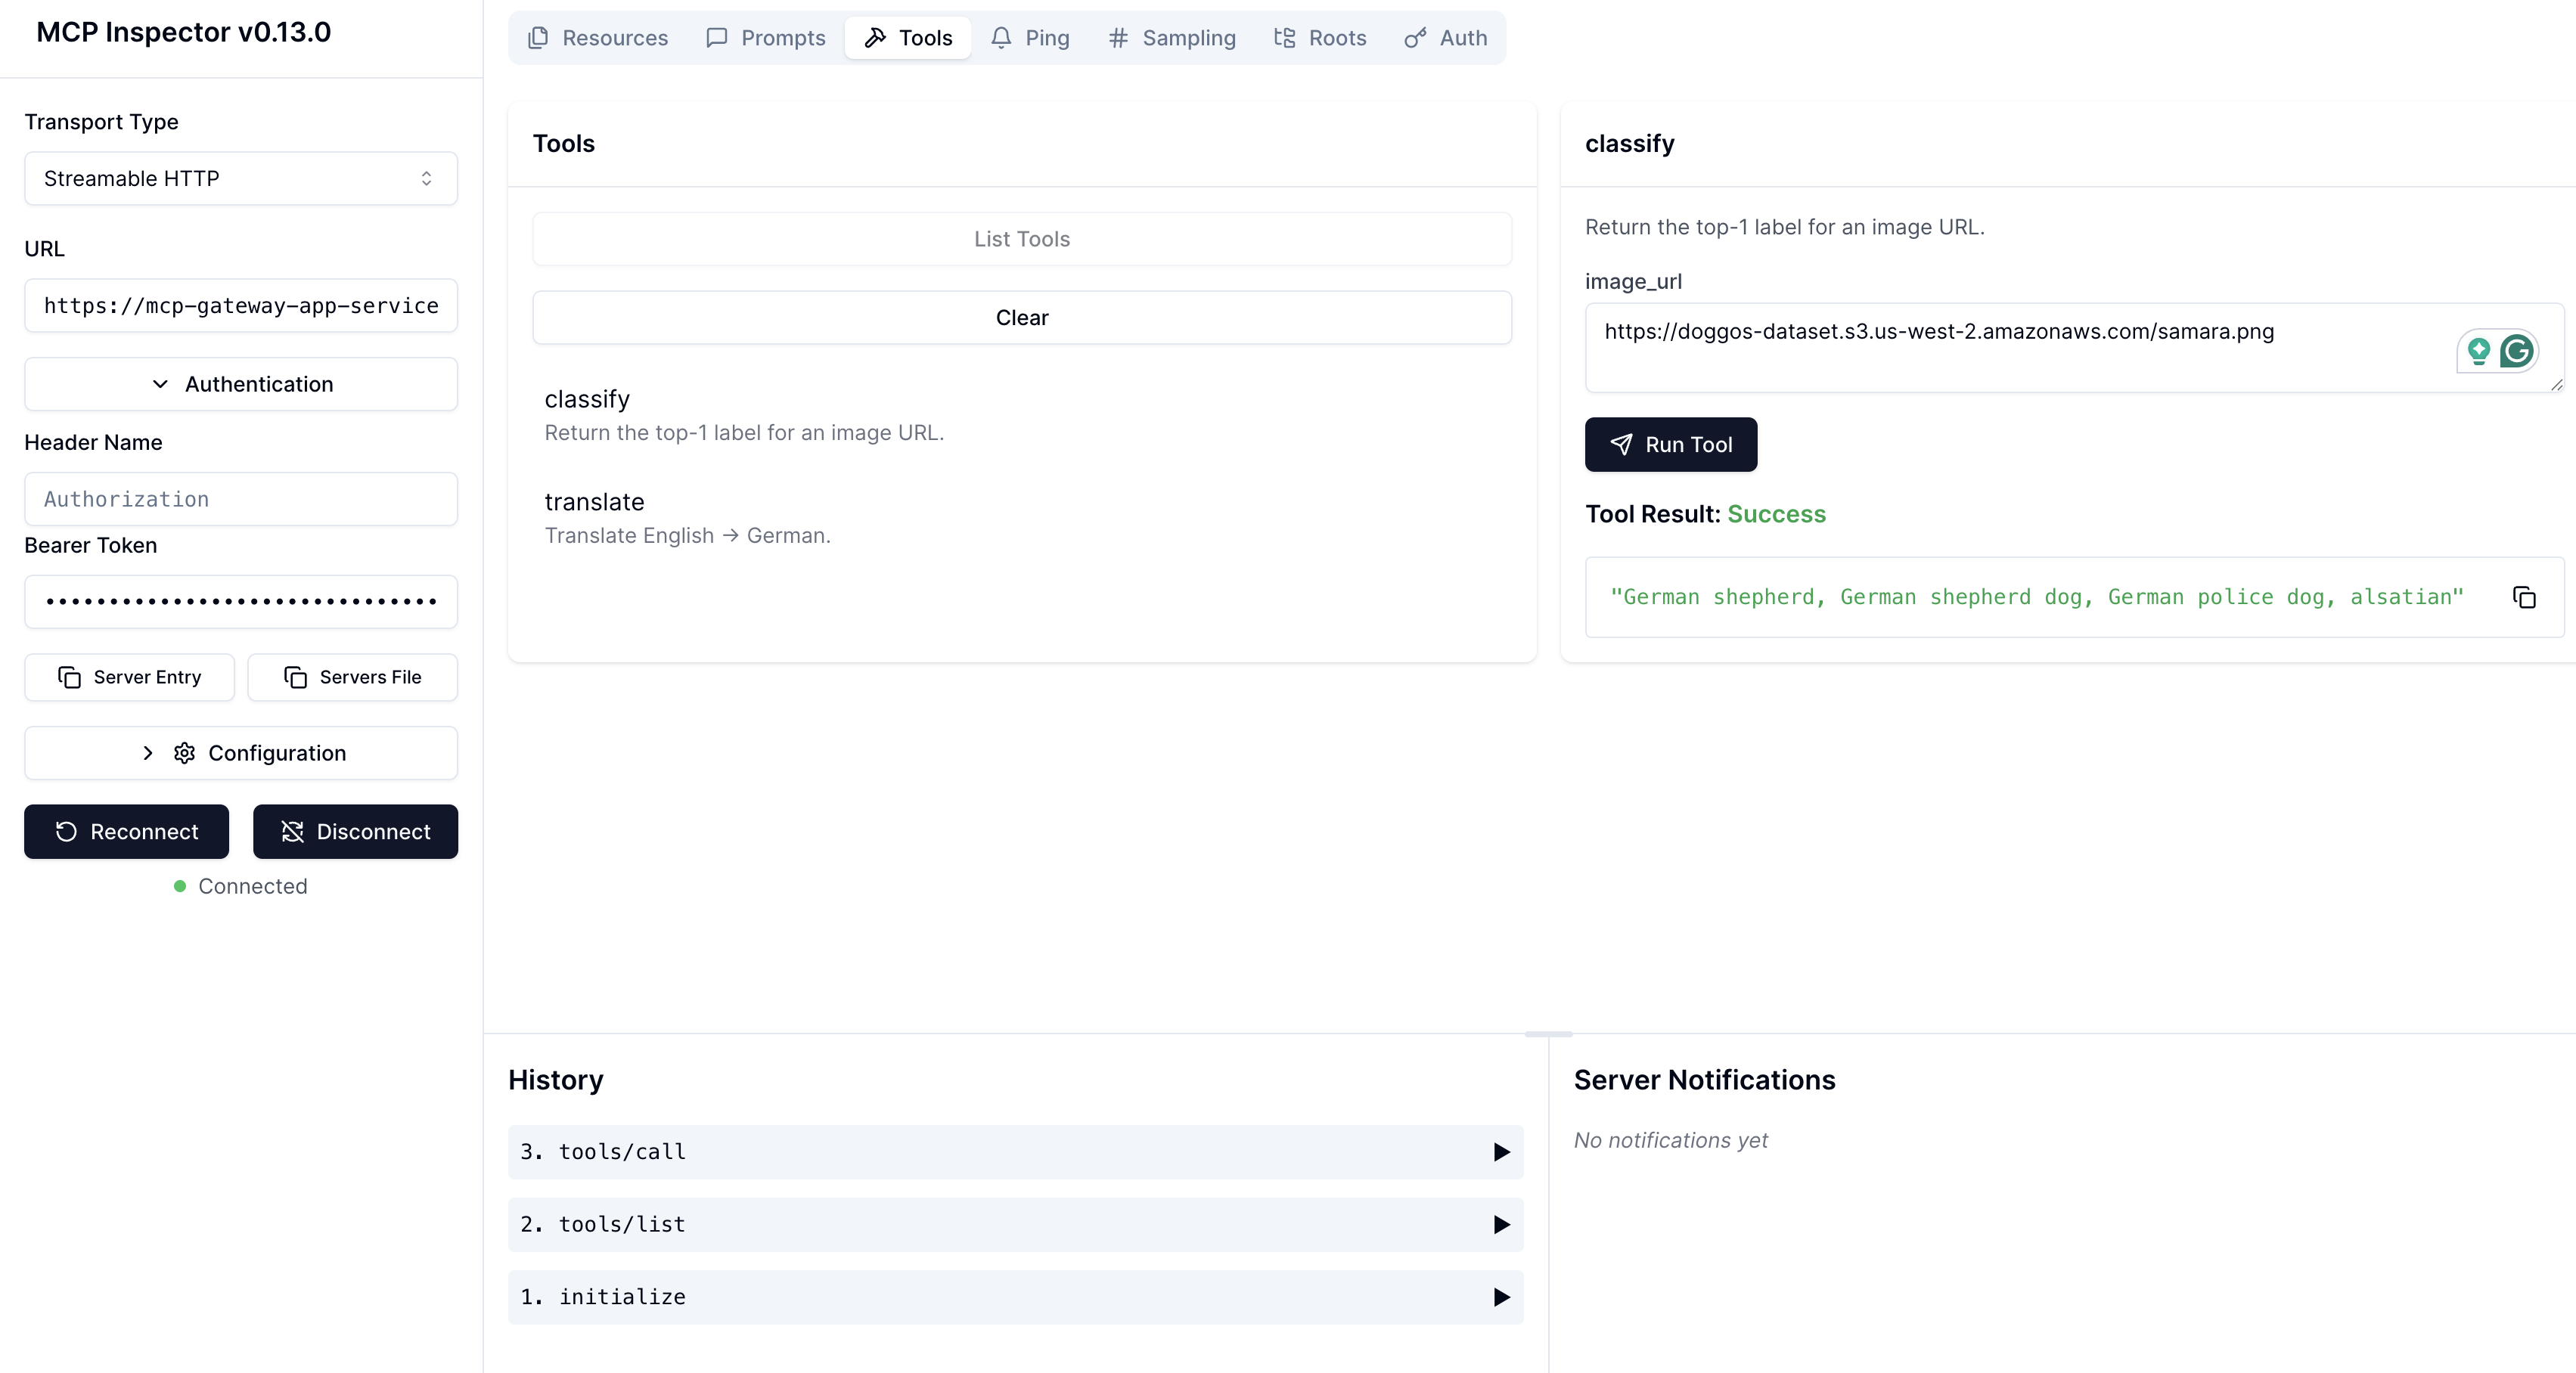
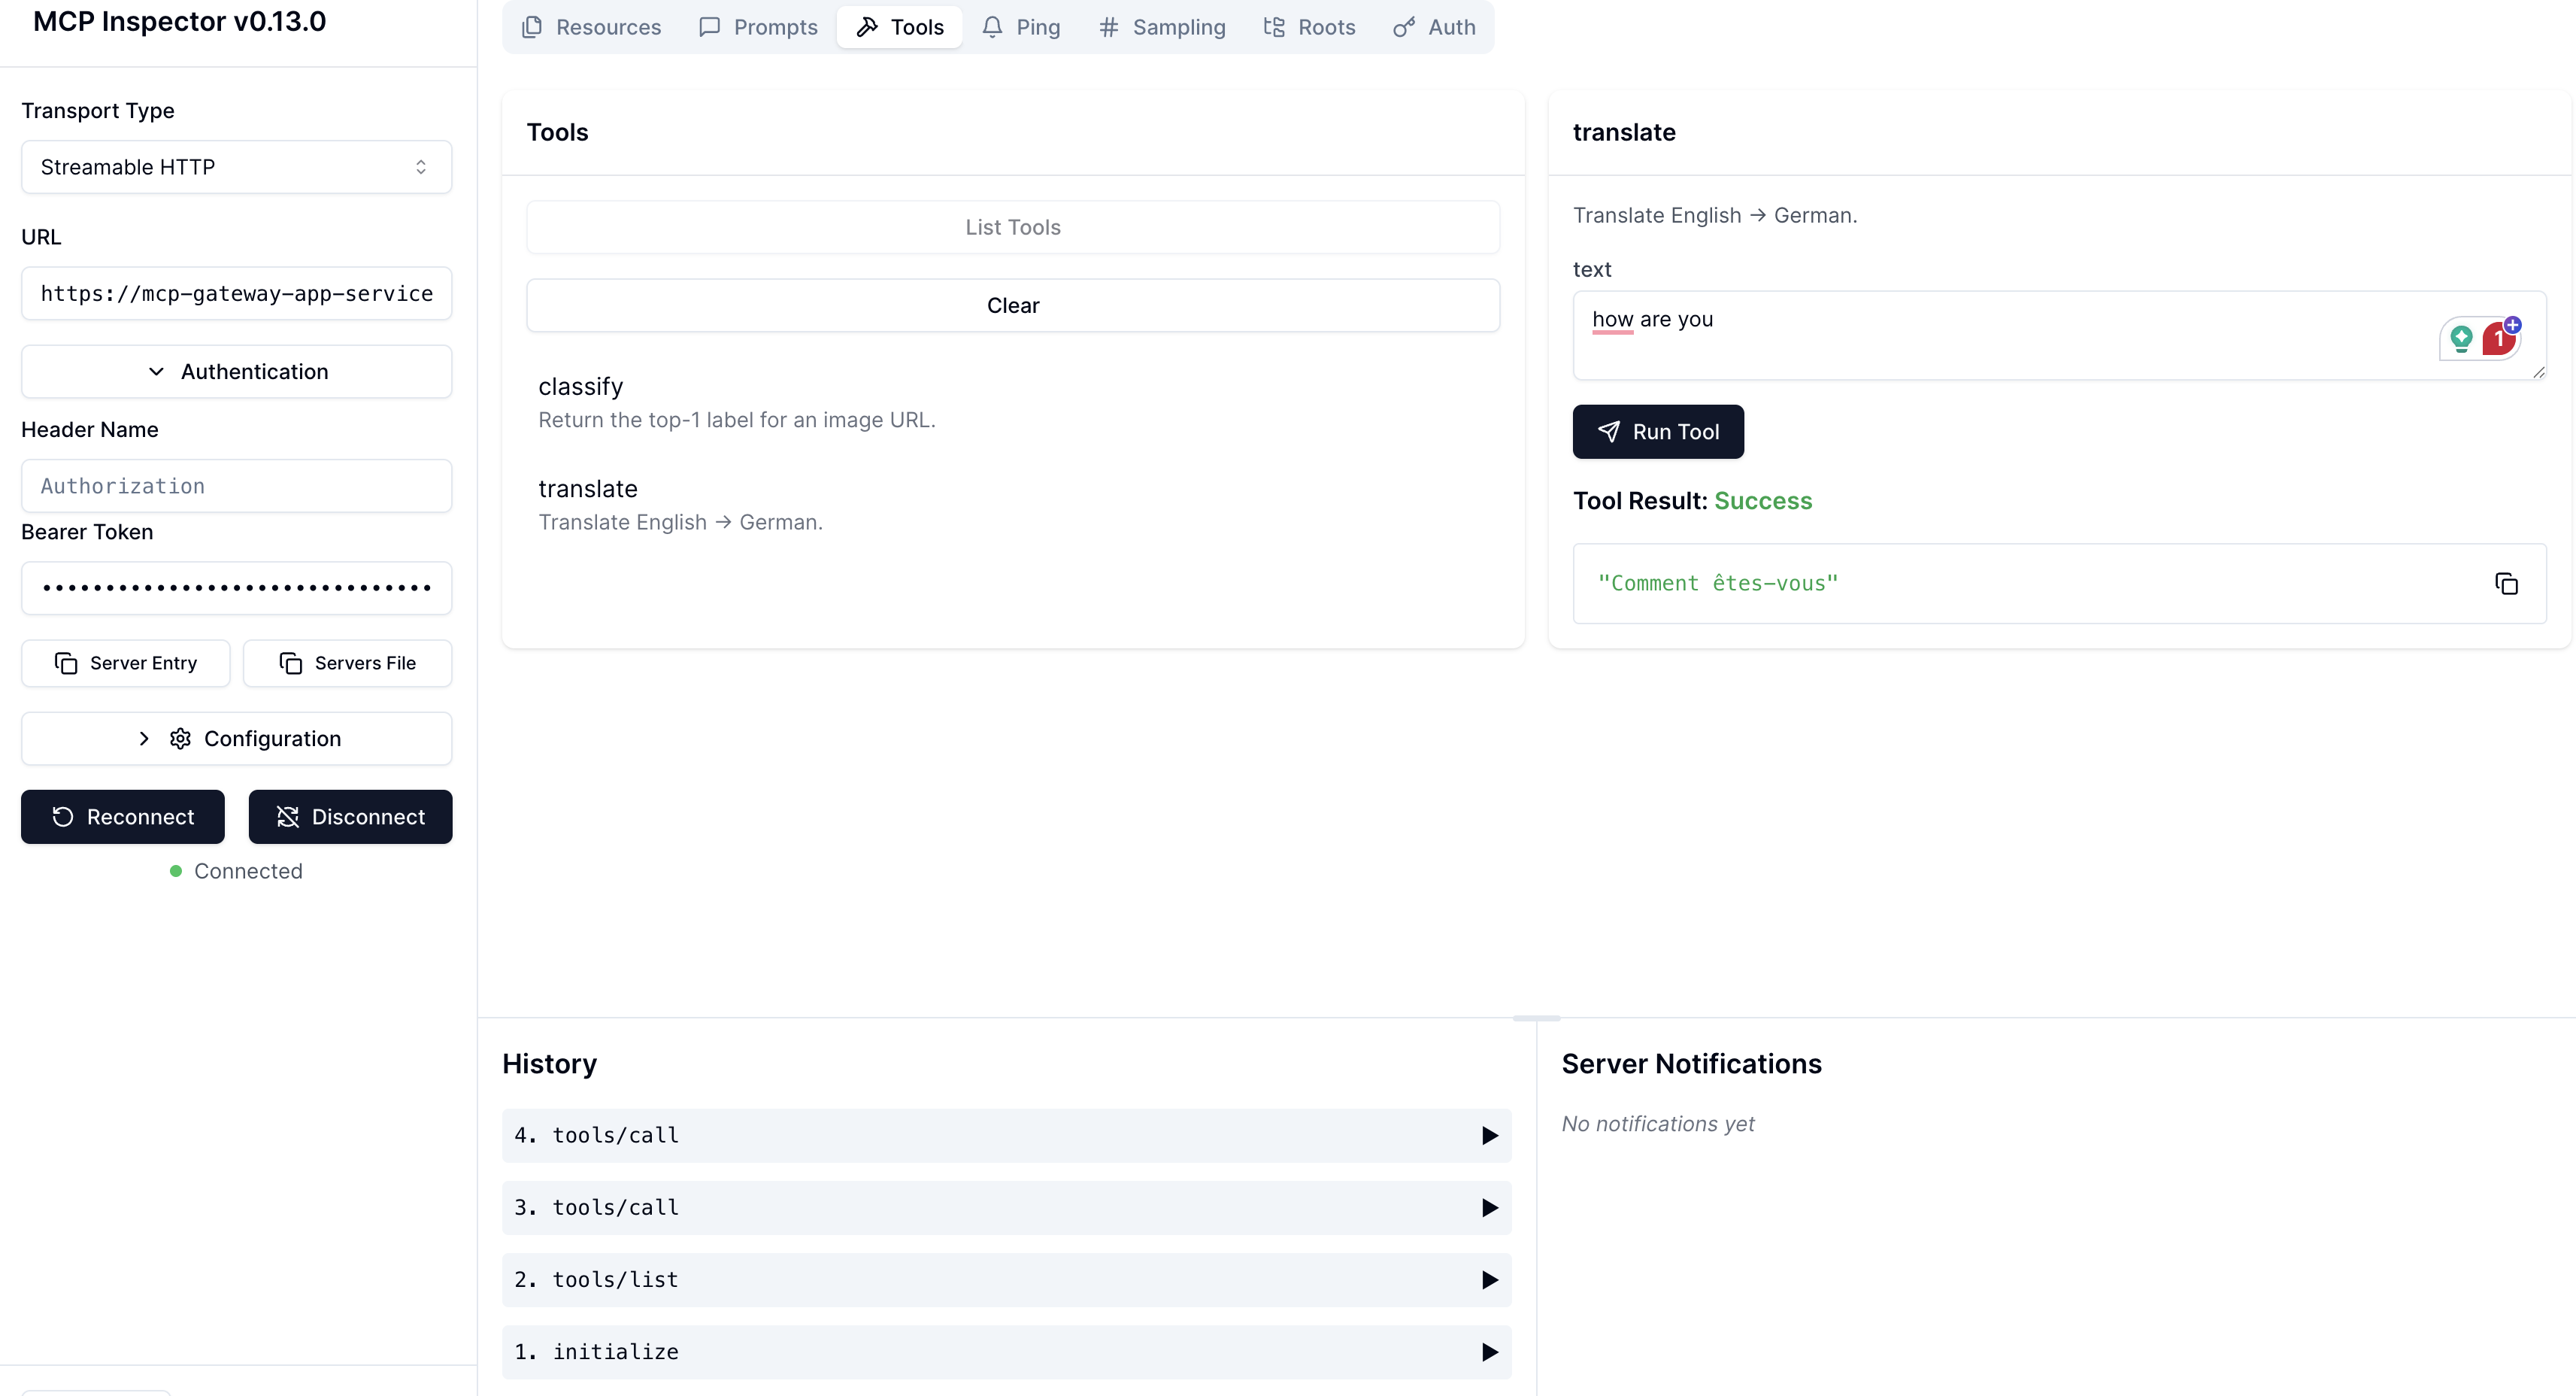
7. Test with MCP Inspector#
Follow the instructions in Notebook #1 to set up MCP Inspector on your local machine.
Then go to the http://127.0.0.1:6274/ to find the Inspector UI and enter the following:
Transport Type: Streamable HTTP
URL: https://mcp-gateway-app-service-jgz99.cld-kvedzwag2qa8i5bj.s.anyscaleuserdata.com/mcp_gateway/mcp
Bearer token = “CCq8xuiXup_tWcyo-CjfcdyMhiTAnCzQkuXChnmnzoc”
Note: Use your own service URL and bearer token.
Then you can test the following remote MCP servers that have connected with your Ray serve apps.
Image classifier tool calling result:#
Text translator tool calling result:#
8. Terminate the Anyscale Service#
After testing the service, you can shutdown the serive with this command:
anyscale service terminate --name=mcp-gateway-app-service