Deploy Multiple Applications#
Serve supports deploying multiple independent Serve applications. This user guide walks through how to generate a multi-application config file and deploy it using the Serve CLI, and monitor your applications using the CLI and the Ray Serve dashboard.
Context#
Background#
With the introduction of multi-application Serve, we walk you through the new concept of applications and when you should choose to deploy a single application versus multiple applications per cluster.
An application consists of one or more deployments. The deployments in an application are tied into a directed acyclic graph through model composition. An application can be called via HTTP at the specified route prefix, and the ingress deployment handles all such inbound traffic. Due to the dependence between deployments in an application, one application is a unit of upgrade.
When to use multiple applications#
You can solve many use cases by using either model composition or multi-application. However, both have their own individual benefits and can be used together.
Suppose you have multiple models and/or business logic that all need to be executed for a single request. If they are living in one repository, then you most likely upgrade them as a unit, so we recommend having all those deployments in one application.
On the other hand, if these models or business logic have logical groups, for example, groups of models that communicate with each other but live in different repositories, we recommend separating the models into applications. Another common use-case for multiple applications is separate groups of models that may not communicate with each other, but you want to co-host them to increase hardware utilization. Because one application is a unit of upgrade, having multiple applications allows you to deploy many independent models (or groups of models) each behind different endpoints. You can then easily add or delete applications from the cluster as well as upgrade applications independently of each other.
Getting started#
Define a Serve application:
import requests
import starlette

from transformers import pipeline
from io import BytesIO
from PIL import Image

from ray import serve
from ray.serve.handle import DeploymentHandle


@serve.deployment
def downloader(image_url: str):
    image_bytes = requests.get(image_url).content
    image = Image.open(BytesIO(image_bytes)).convert("RGB")
    return image


@serve.deployment
class ImageClassifier:
    def __init__(self, downloader: DeploymentHandle):
        self.downloader = downloader
        self.model = pipeline(
            "image-classification", model="google/vit-base-patch16-224"
        )

    async def classify(self, image_url: str) -> str:
        image = await self.downloader.remote(image_url)
        results = self.model(image)
        return results[0]["label"]

    async def __call__(self, req: starlette.requests.Request):
        req = await req.json()
        return await self.classify(req["image_url"])


app = ImageClassifier.bind(downloader.bind())
Copy this code to a file named image_classifier.py.
Define a second Serve application:
import starlette

from transformers import AutoModelForSeq2SeqLM, AutoTokenizer

from ray import serve


@serve.deployment
class Translator:
    def __init__(self):
        self.tokenizer = AutoTokenizer.from_pretrained("t5-small")
        self.model = AutoModelForSeq2SeqLM.from_pretrained("t5-small")

    def translate(self, text: str) -> str:
        input_ids = self.tokenizer(
            f"translate English to German: {text}", return_tensors="pt"
        ).input_ids
        output_ids = self.model.generate(
            input_ids, num_beams=4, early_stopping=True, max_length=300
        )
        return self.tokenizer.decode(
            output_ids[0], skip_special_tokens=True, clean_up_tokenization_spaces=False
        )

    async def __call__(self, req: starlette.requests.Request):
        req = await req.json()
        return self.translate(req["text"])


app = Translator.bind()
Copy this code to a file named text_translator.py.
Generate a multi-application config file that contains both of these two applications and save it to config.yaml.
serve build image_classifier:app text_translator:app -o config.yaml
This generates the following config:
proxy_location: EveryNode

http_options:
  host: 0.0.0.0
  port: 8000

grpc_options:
  port: 9000
  grpc_servicer_functions: []

logging_config:
  encoding: JSON
  log_level: INFO
  logs_dir: null
  enable_access_log: true

applications:
  - name: app1
    route_prefix: /classify
    import_path: image_classifier:app
    runtime_env: {}
    deployments:
      - name: downloader
      - name: ImageClassifier

  - name: app2
    route_prefix: /translate
    import_path: text_translator:app
    runtime_env: {}
    deployments:
      - name: Translator
Note
The names for each application are auto-generated as app1, app2, etc. To give custom names to the applications, modify the config file before moving on to the next step.
Deploy the applications#
To deploy the applications, be sure to start a Ray cluster first.
$ ray start --head

$ serve deploy config.yaml
> Sent deploy request successfully!
Query the applications at their respective endpoints, /classify and /translate.
bear_url = "https://cdn.britannica.com/41/156441-050-A4424AEC/Grizzly-bear-Jasper-National-Park-Canada-Alberta.jpg"  # noqa
resp = requests.post("http://localhost:8000/classify", json={"image_url": bear_url})

print(resp.text)
# 'brown bear, bruin, Ursus arctos'
text = "Hello, the weather is quite fine today!"
resp = requests.post("http://localhost:8000/translate", json={"text": text})

print(resp.text)
# 'Hallo, das Wetter ist heute ziemlich gut!'
Development workflow with serve run#
You can also use the CLI command serve run to run and test your application easily, either locally or on a remote cluster.
$ serve run config.yaml
> 2023-04-04 11:00:05,901 INFO scripts.py:327 -- Deploying from config file: "config.yaml".
> 2023-04-04 11:00:07,505 INFO worker.py:1613 -- Started a local Ray instance. View the dashboard at http://127.0.0.1:8265
> 2023-04-04 11:00:09,012 SUCC scripts.py:393 -- Submitted deploy config successfully.
The serve run command blocks the terminal, which allows logs from Serve to stream to the console. This helps you test and debug your applications easily. If you want to change your code, you can hit Ctrl-C to interrupt the command and shutdown Serve and all its applications, then rerun serve run.
Note
serve run only supports running multi-application config files. If you want to run applications by directly passing in an import path, serve run can only run one application import path at a time.
Check status#
Check the status of the applications by running serve status.
$ serve status
proxies:
2e02a03ad64b3f3810b0dd6c3265c8a00ac36c13b2b0937cbf1ef153: HEALTHY
applications:
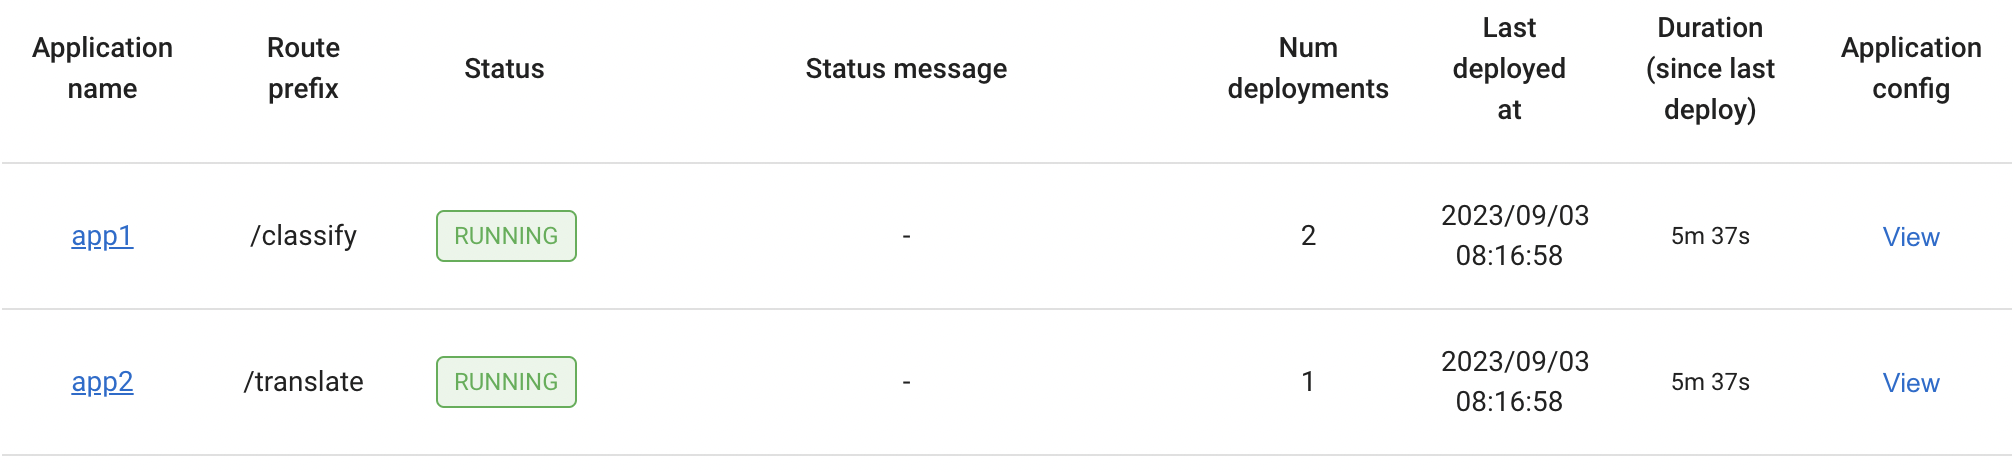
app1:
status: RUNNING
message: ''
last_deployed_time_s: 1693267064.0735464
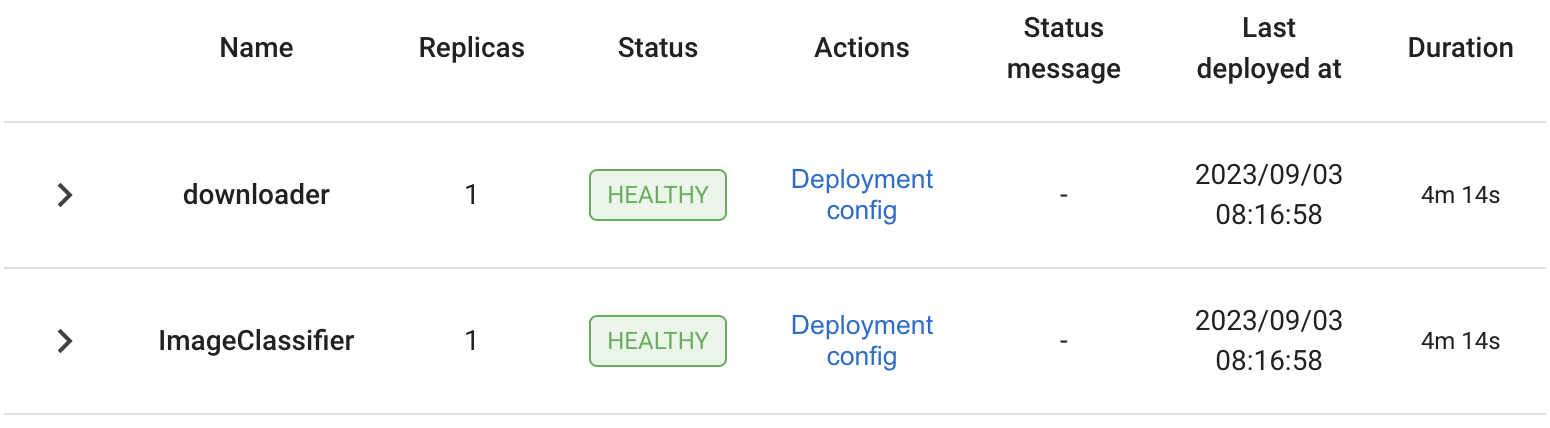
deployments:
downloader:
status: HEALTHY
replica_states:
RUNNING: 1
message: ''
ImageClassifier:
status: HEALTHY
replica_states:
RUNNING: 1
message: ''
app2:
status: RUNNING
message: ''
last_deployed_time_s: 1693267064.0735464
deployments:
Translator:
status: HEALTHY
replica_states:
RUNNING: 1
message: ''
Send requests between applications#
You can also make calls between applications without going through HTTP by using the Serve API serve.get_app_handle to get a handle to any live Serve application on the cluster. This handle can be used to directly execute a request on an application. Take the classifier and translator app above as an example. You can modify the __call__ method of the ImageClassifier to check for another parameter in the HTTP request, and send requests to the translator application.
    async def __call__(self, req: starlette.requests.Request):
        req = await req.json()
        result = await self.classify(req["image_url"])

        if req.get("should_translate") is True:
            handle: DeploymentHandle = serve.get_app_handle("app2")
            return await handle.translate.remote(result)

        return result
Then, send requests to the classifier application with the should_translate flag set to True:
bear_url = "https://cdn.britannica.com/41/156441-050-A4424AEC/Grizzly-bear-Jasper-National-Park-Canada-Alberta.jpg"  # noqa
resp = requests.post(
    "http://localhost:8000/classify",
    json={"image_url": bear_url, "should_translate": True},
)

print(resp.text)
# 'Braunbär, Bruin, Ursus arctos'
Inspect deeper#
For more visibility into the applications running on the cluster, go to the Ray Serve dashboard at http://localhost:8265/#/serve.
You can see all applications that are deployed on the Ray cluster:
The list of deployments under each application:
As well as the list of replicas for each deployment:

For more details on the Ray Serve dashboard, see the Serve dashboard documentation.
Add, delete, and update applications#
You can add, remove or update entries under the applications field to add, remove or update applications in the cluster. This doesn’t affect other applications on the cluster. To update an application, modify the config options in the corresponding entry under the applications field.
Note
The in-place update behavior for an application when you resubmit a config is the same as the single-application behavior. For how an application reacts to different config changes, see Updating a Serve Application.
Migrating from a single-application config#
Migrating the single-application config ServeApplicationSchema to the multi-application config format ServeDeploySchema is straightforward. Each entry under the applications field matches the old, single-application config format. To convert a single-application config to the multi-application config format:
Copy the entire old config to an entry under the
applicationsfield.Remove
hostandportfrom the entry and move them under thehttp_optionsfield.Name the application.
If you haven’t already, set the application-level
route_prefixto the route prefix of the ingress deployment in the application. In a multi-application config, you should set route prefixes at the application level instead of for the ingress deployment in each application.When needed, add more applications.
For more details on the multi-application config format, see the documentation for ServeDeploySchema.
Note
You must remove host and port from the application entry. In a multi-application config, specifying cluster-level options within an individual application isn’t applicable, and is not supported.