Building a Real-time Object Detection Service with Ray Serve#
Overview#
This tutorial demonstrates how to deploy a production-ready object detection service using Ray Serve. You will learn how to serve a YOLOv5 object detection model efficiently with automatic GPU resource management and scaling capabilities.
Installation#
Install the required dependencies:
pip install "ray[serve]" requests torch pillow numpy opencv-python-headless pandas "gitpython>=3.1.30"
Implementation#
This example uses the ultralytics/yolov5 model for object detection and FastAPI for creating the web API.
Code Structure#
Save the following code to a file named object_detection.py:
import torch
from PIL import Image
import numpy as np
from io import BytesIO
from fastapi.responses import Response
from fastapi import FastAPI

from ray import serve
from ray.serve.handle import DeploymentHandle


app = FastAPI()


@serve.deployment(num_replicas=1)
@serve.ingress(app)
class APIIngress:
    def __init__(self, object_detection_handle: DeploymentHandle):
        self.handle = object_detection_handle

    @app.get(
        "/detect",
        responses={200: {"content": {"image/jpeg": {}}}},
        response_class=Response,
    )
    async def detect(self, image_url: str):
        image = await self.handle.detect.remote(image_url)
        file_stream = BytesIO()
        image.save(file_stream, "jpeg")
        return Response(content=file_stream.getvalue(), media_type="image/jpeg")


@serve.deployment(
    ray_actor_options={"num_gpus": 1},
    autoscaling_config={"min_replicas": 1, "max_replicas": 2},
)
class ObjectDetection:
    def __init__(self):
        self.model = torch.hub.load("ultralytics/yolov5", "yolov5s")
        self.model.cuda()
        self.model.to(torch.device(0))

    def detect(self, image_url: str):
        result_im = self.model(image_url)
        return Image.fromarray(result_im.render()[0].astype(np.uint8))


entrypoint = APIIngress.bind(ObjectDetection.bind())
The code consists of two main deployments:
APIIngress: A FastAPI-based frontend that handles HTTP requests
ObjectDetection: The backend deployment that loads the YOLOv5 model and performs inference on GPU
Note
Understanding Autoscaling
The configuration in this example sets min_replicas to 0, which means:
The deployment starts with no
ObjectDetectionreplicasRay Serve creates replicas only when requests arrive
After a period of inactivity, Ray Serve scales down the replicas back to 0
This “scale-to-zero” capability helps conserve GPU resources when the service isn’t being actively used
Deployment#
Deploy the service with:
serve run object_detection:entrypoint
When successfully deployed, you should see log messages similar to:
(ServeReplica:ObjectDection pid=4747)   warnings.warn(
(ServeReplica:ObjectDection pid=4747) Downloading: "https://github.com/ultralytics/yolov5/zipball/master" to /home/ray/.cache/torch/hub/master.zip
(ServeReplica:ObjectDection pid=4747) YOLOv5 🚀 2023-3-8 Python-3.9.16 torch-1.13.0+cu116 CUDA:0 (Tesla T4, 15110MiB)
(ServeReplica:ObjectDection pid=4747)
(ServeReplica:ObjectDection pid=4747) Fusing layers...
(ServeReplica:ObjectDection pid=4747) YOLOv5s summary: 213 layers, 7225885 parameters, 0 gradients
(ServeReplica:ObjectDection pid=4747) Adding AutoShape...
2023-03-08 21:10:21,685 SUCC <string>:93 -- Deployed Serve app successfully.
Troubleshooting#
Tip
Common OpenCV Error
You might encounter this error when running the example:
ImportError: libGL.so.1: cannot open shared object file: No such file or directory
This typically happens when running opencv-python in headless environments like containers. The solution is to use the headless version:
pip uninstall opencv-python; pip install opencv-python-headless
Testing the Service#
Once the service is running, you can test it with the following Python code:
import requests

# Sample image URL for testing
image_url = "https://ultralytics.com/images/zidane.jpg"

# Send request to the object detection service
resp = requests.get(f"http://127.0.0.1:8000/detect?image_url={image_url}")

# Save the annotated image with detected objects
with open("output.jpeg", 'wb') as f:
    f.write(resp.content)
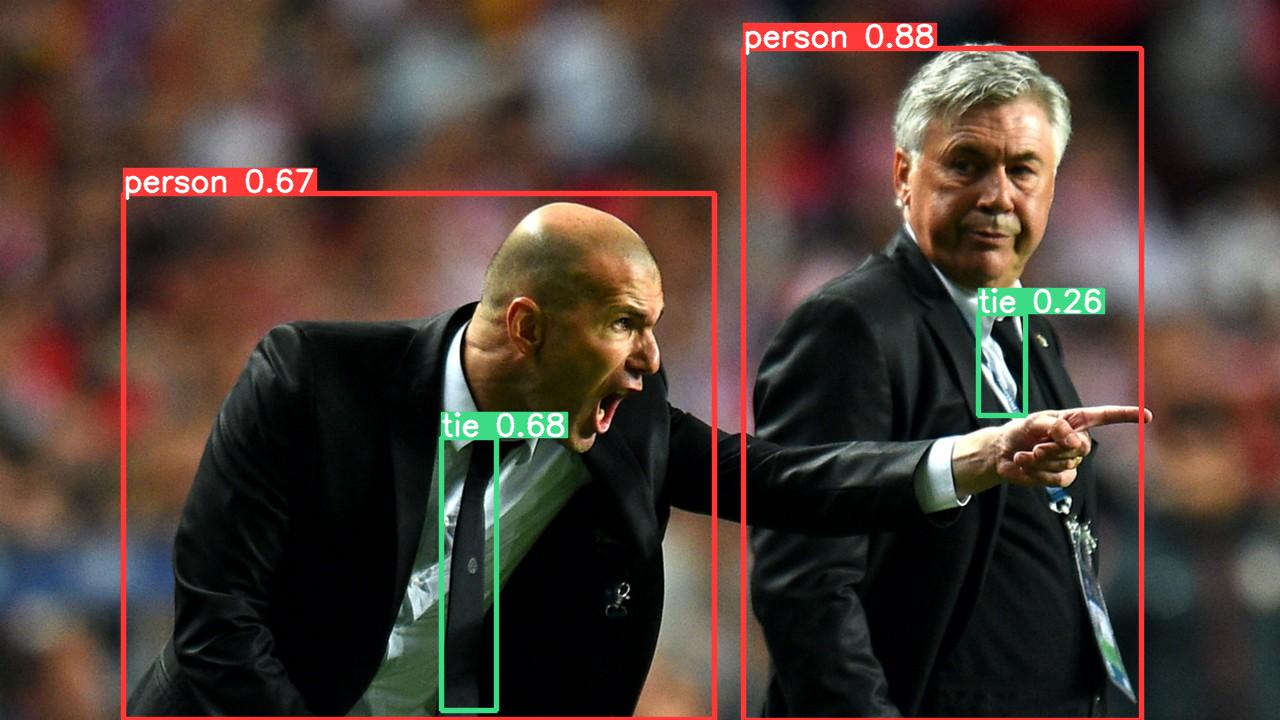
Example Output#
The service processes the image and returns it with bounding boxes around detected objects: