Ray for ML Infrastructure#
Tip
We’d love to hear from you if you are using Ray to build an ML platform! Fill out this short form to get involved.
Ray and its AI libraries provide a unified compute runtime for teams looking to simplify their ML platform. Ray’s libraries such as Ray Train, Ray Data, and Ray Serve can be used to compose end-to-end ML workflows, providing features and APIs for data preprocessing as part of training, and transitioning from training to serving.

Why Ray for ML Infrastructure?#
Ray’s AI libraries simplify the ecosystem of machine learning frameworks, platforms, and tools, by providing a seamless, unified, and open experience for scalable ML:

1. Seamless Dev to Prod: Ray’s AI libraries reduce friction going from development to production. With Ray and its libraries, the same Python code scales seamlessly from a laptop to a large cluster.
2. Unified ML API and Runtime: Ray’s APIs enable swapping between popular frameworks, such as XGBoost, PyTorch, and Hugging Face, with minimal code changes. Everything from training to serving runs on a single runtime (Ray + KubeRay).
3. Open and Extensible: Ray is fully open-source and can run on any cluster, cloud, or Kubernetes. Build custom components and integrations on top of scalable developer APIs.
Example ML Platforms built on Ray#
Merlin is Shopify’s ML platform built on Ray. It enables fast-iteration and scaling of distributed applications such as product categorization and recommendations.
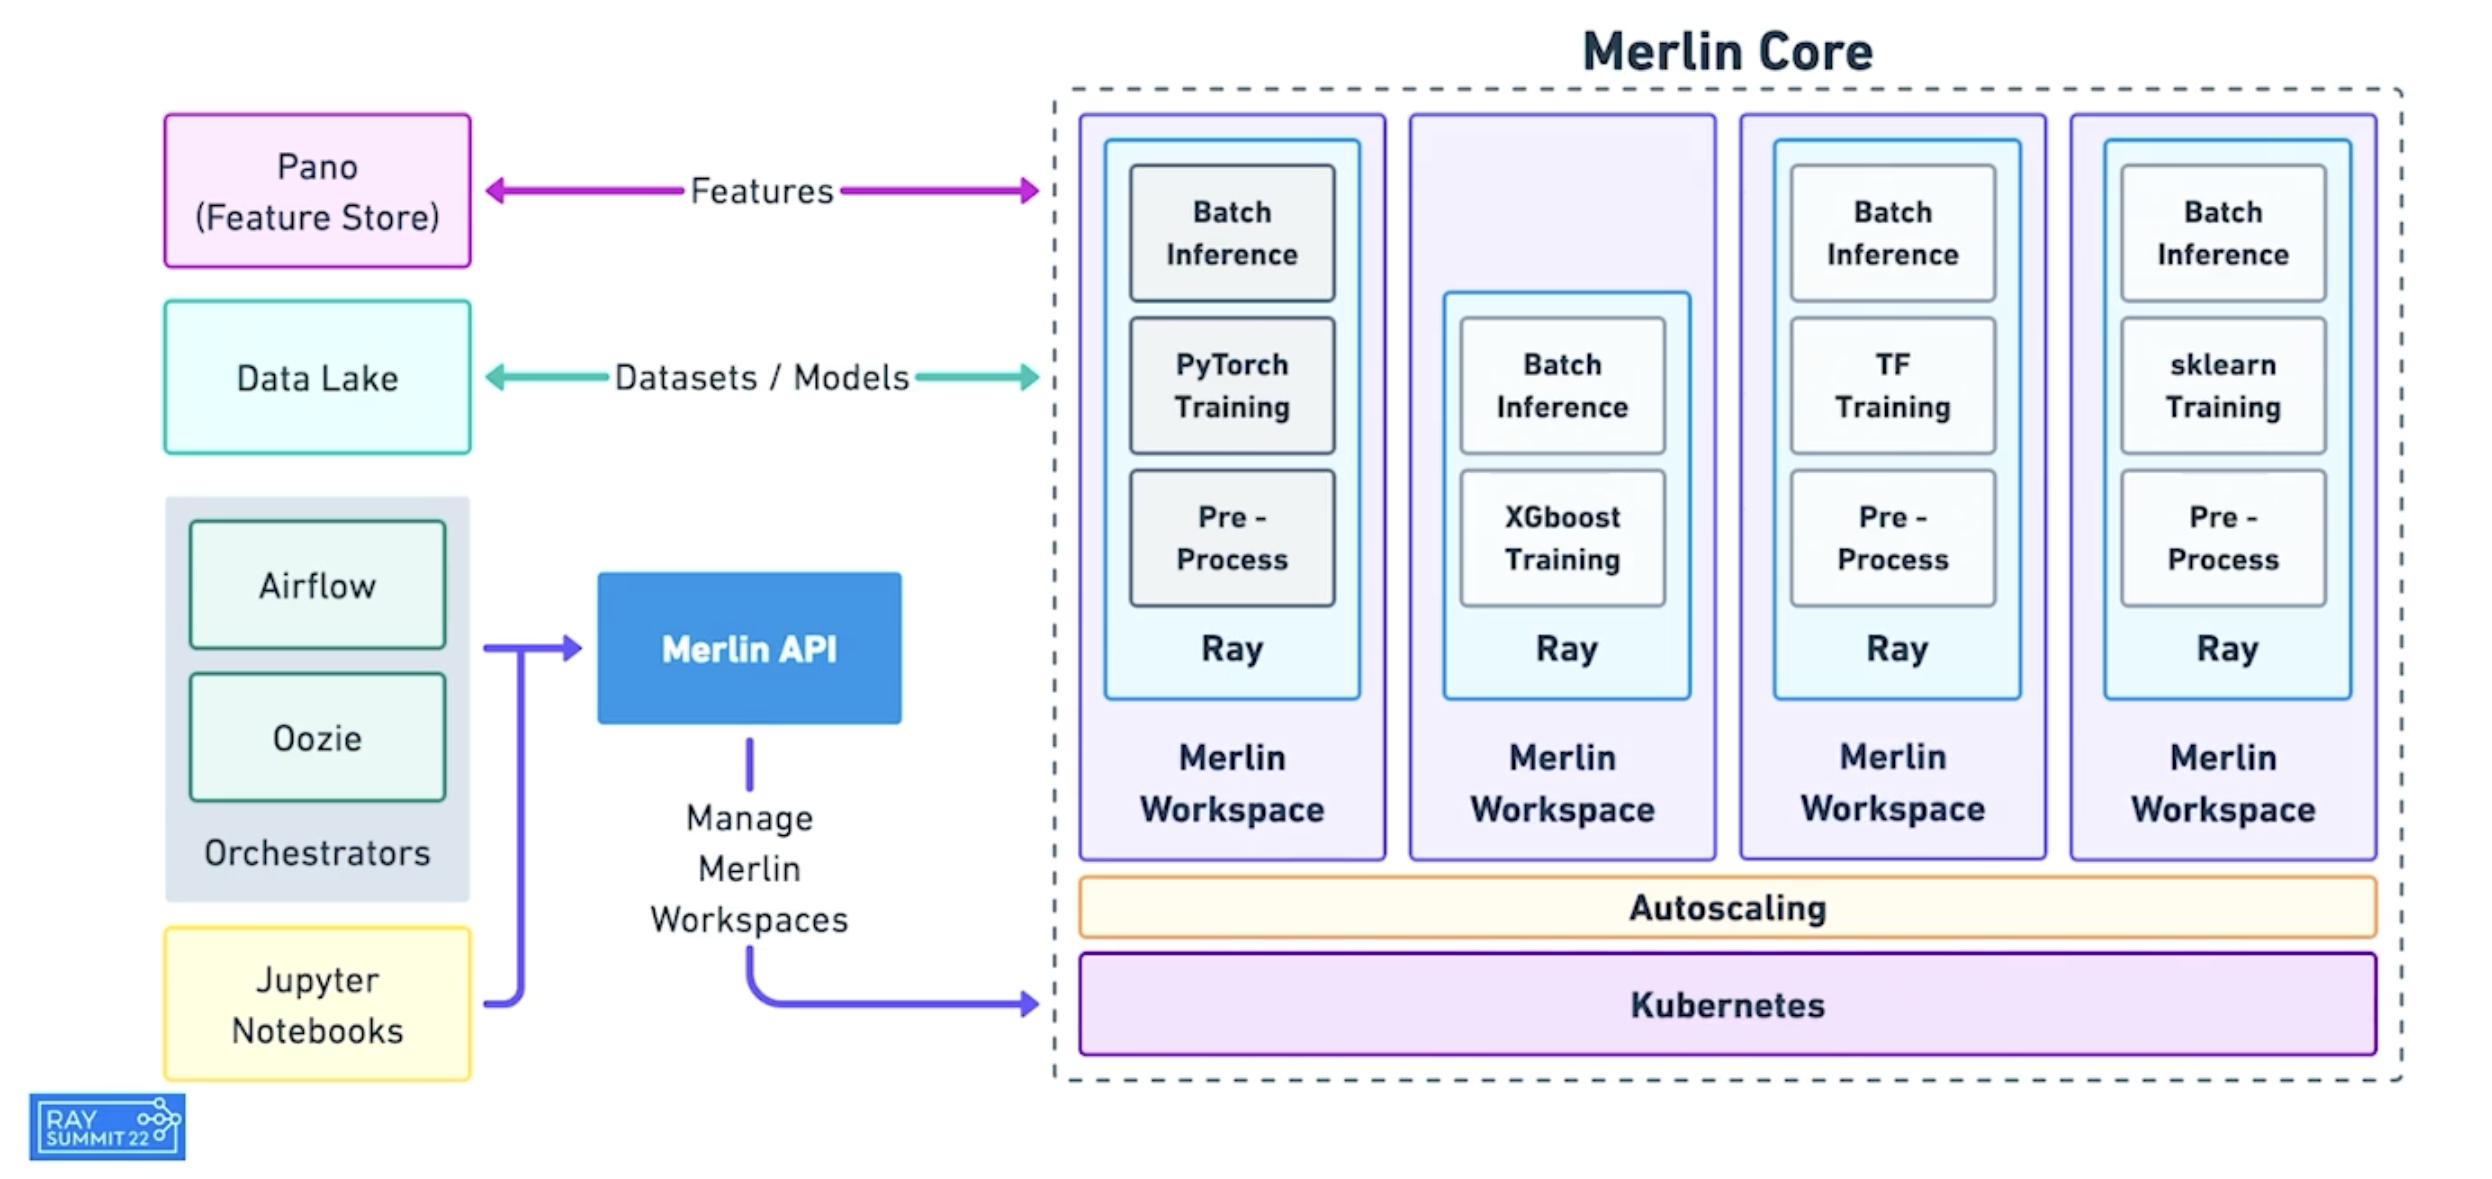
Shopify’s Merlin architecture built on Ray.#
Spotify uses Ray for advanced applications that include personalizing content recommendations for home podcasts, and personalizing Spotify Radio track sequencing.
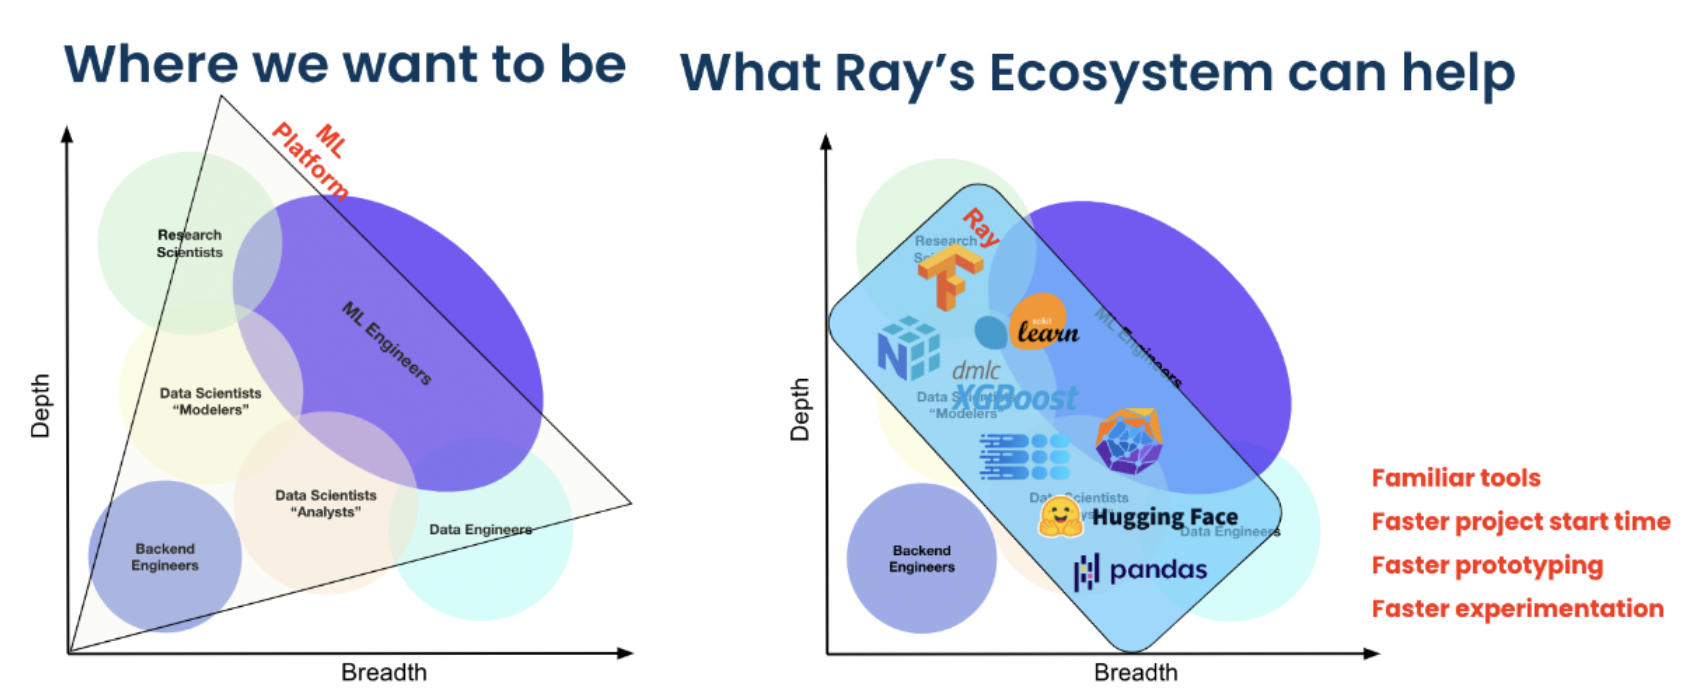
How Ray ecosystem empowers ML scientists and engineers at Spotify.#
The following highlights feature companies leveraging Ray’s unified API to build simpler, more flexible ML platforms.
Deploying Ray for ML platforms#
This page describes how you might use or deploy Ray in your infrastructure. There are two main deployment patterns – pick and choose, and within existing platforms.
The core idea is that Ray can be complementary to your existing infrastructure and integration tools.
Design Principles#
Ray and its libraries handle the heavyweight compute aspects of AI apps and services.
Ray relies on external integrations (e.g., Tecton, MLFlow, W&B) for Storage and Tracking.
Workflow Orchestrators (e.g., AirFlow) are an optional component that can be used for scheduling recurring jobs, launching new Ray clusters for jobs, and running non-Ray compute steps.
Lightweight orchestration of task graphs within a single Ray app can be handled using Ray tasks.
Ray libraries can be used independently, within an existing ML platform, or to build a Ray-native ML platform.
Pick and choose your own libraries#
You can pick and choose which Ray AI libraries you want to use.
This is applicable if you are an ML engineer who wants to independently use a Ray library for a specific AI app or service use case and do not need to integrate with existing ML platforms.
For example, Alice wants to use RLlib to train models for her work project. Bob wants to use Ray Serve to deploy his model pipeline. In both cases, Alice and Bob can leverage these libraries independently without any coordination.
This scenario describes most usages of Ray libraries today.

In the above diagram:
Only one library is used – showing that you can pick and choose and do not need to replace all of your ML infrastructure to use Ray.
You can use one of Ray’s many deployment modes to launch and manage Ray clusters and Ray applications.
Ray AI libraries can read data from external storage systems such as Amazon S3 / Google Cloud Storage, as well as store results there.
Existing ML Platform integration#
You may already have an existing machine learning platform but want to use some subset of Ray’s ML libraries. For example, an ML engineer wants to use Ray within the ML Platform their organization has purchased (e.g., SageMaker, Vertex).
Ray can complement existing machine learning platforms by integrating with existing pipeline/workflow orchestrators, storage, and tracking services, without requiring a replacement of your entire ML platform.
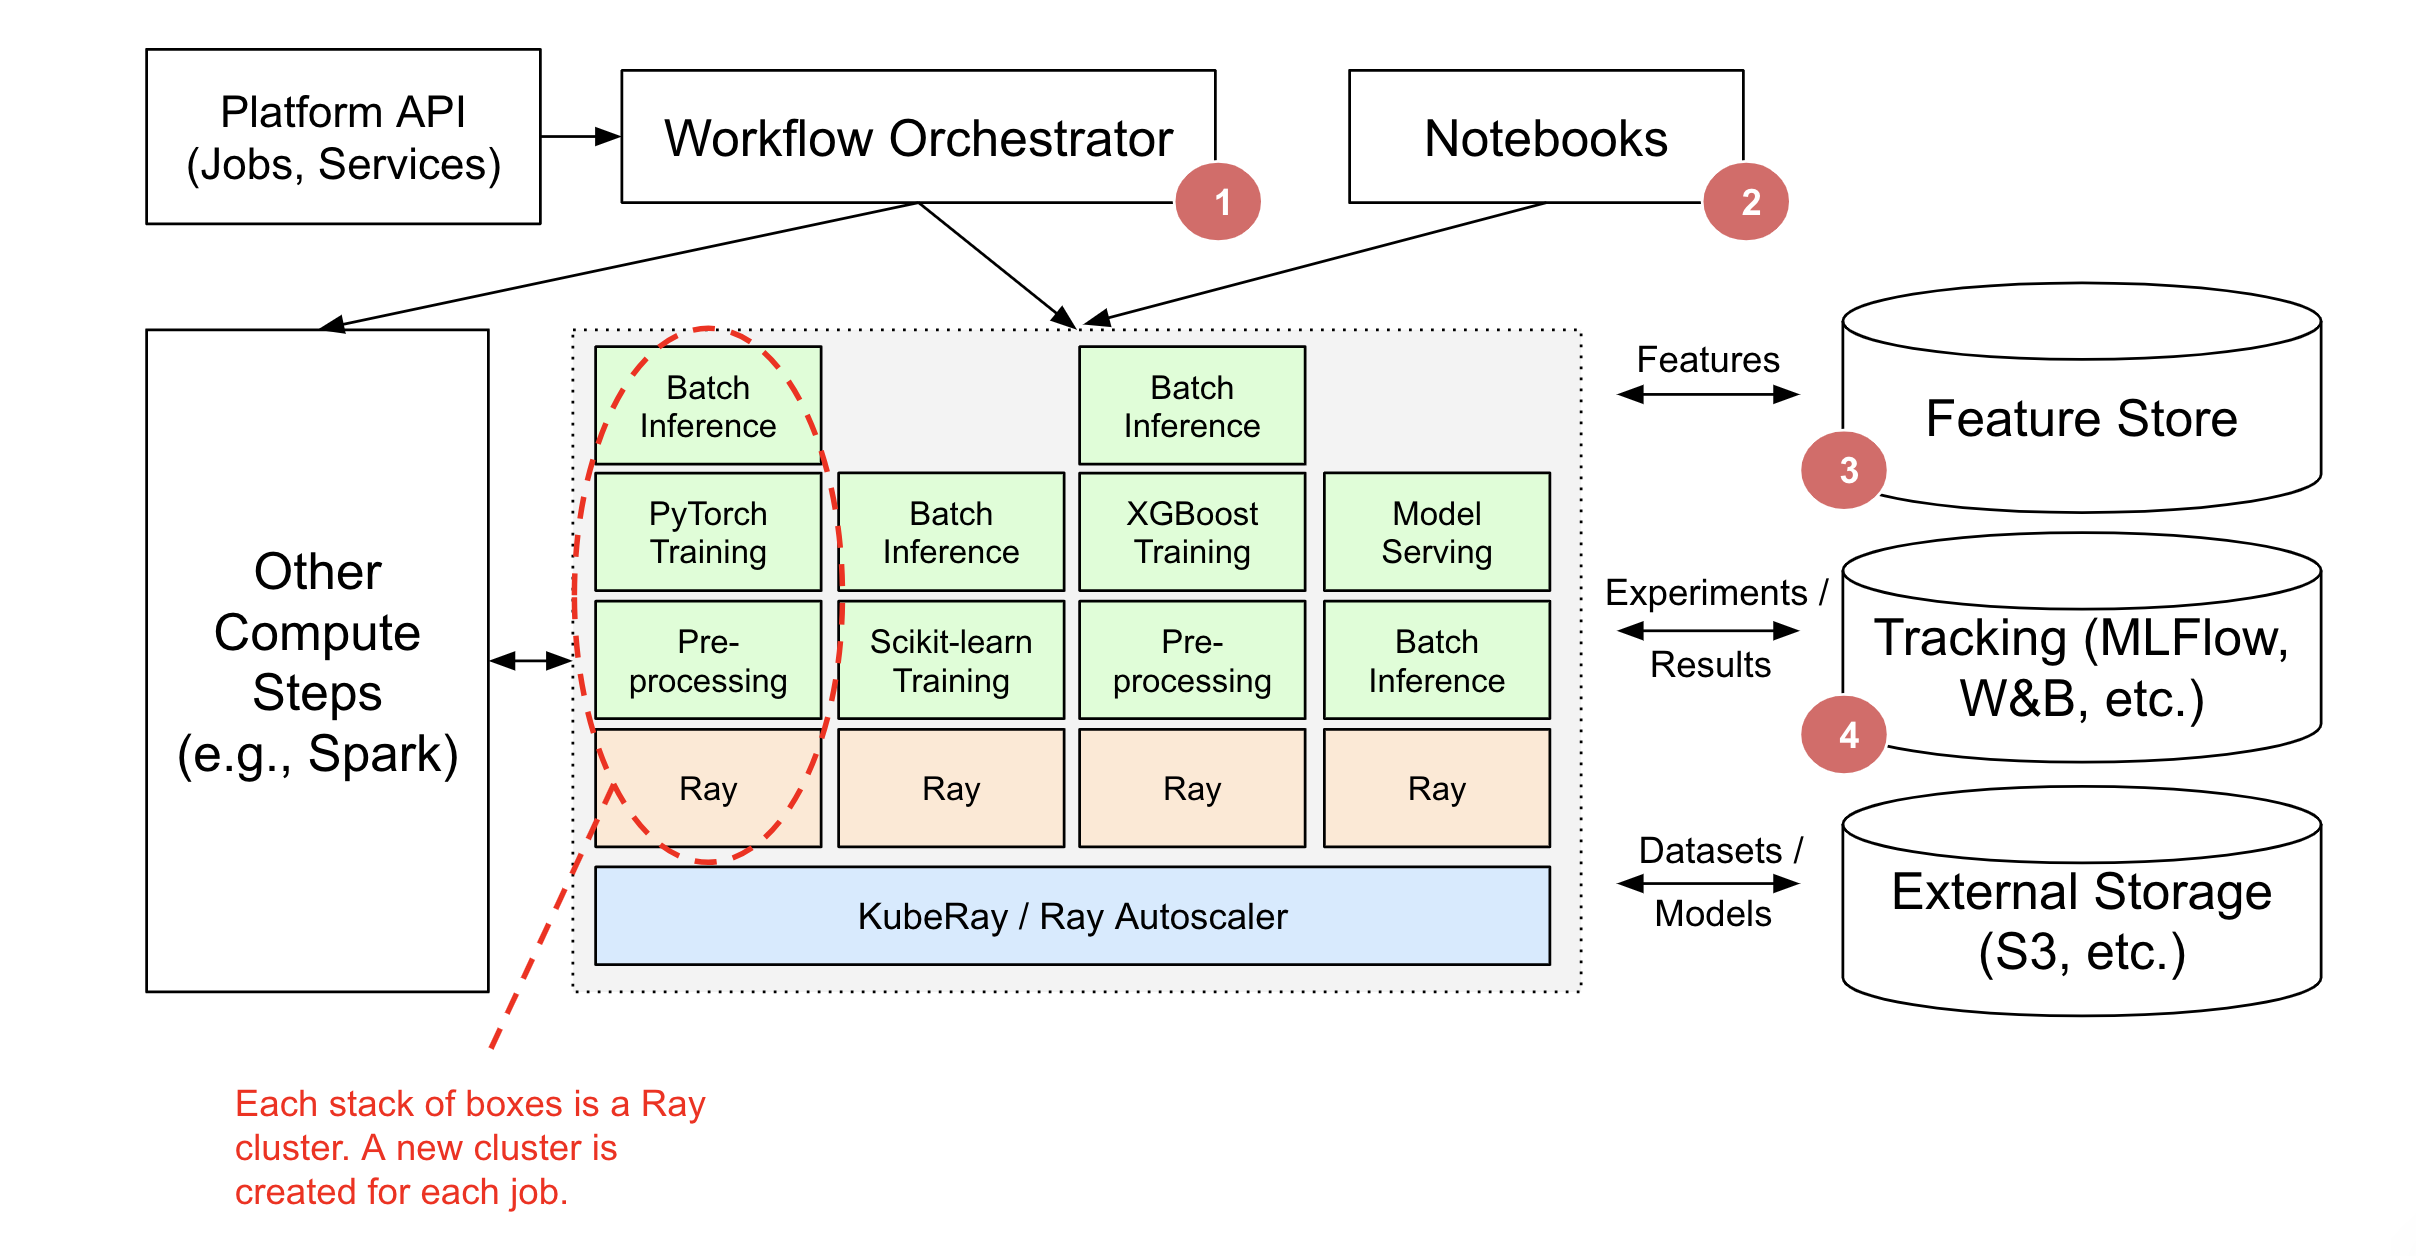
In the above diagram:
A workflow orchestrator such as AirFlow, Oozie, SageMaker Pipelines, etc. is responsible for scheduling and creating Ray clusters and running Ray apps and services. The Ray application may be part of a larger orchestrated workflow (e.g., Spark ETL, then Training on Ray).
Lightweight orchestration of task graphs can be handled entirely within Ray. External workflow orchestrators will integrate nicely but are only needed if running non-Ray steps.
Ray clusters can also be created for interactive use (e.g., Jupyter notebooks, Google Colab, Databricks Notebooks, etc.).
Ray Train, Data, and Serve provide integration with Feature Stores like Feast for Training and Serving.
Ray Train and Tune provide integration with tracking services such as MLFlow and Weights & Biases.