Serve a Stable Diffusion model on GKE with TPUs#
Note: The Python files for the Ray Serve app and its client are in the ray-project/serve_config_examples. This guide adapts the tensorflow/tpu example.
Step 1: Create a Kubernetes cluster with TPUs#
Follow Creating a GKE Cluster with TPUs for KubeRay to create a GKE cluster with 1 CPU node and 1 TPU node.
Step 2: Install the KubeRay operator#
Skip this step if the Ray Operator Addon is enabled in your GKE cluster. Follow Deploy a KubeRay operator instructions to install the latest stable KubeRay operator from the Helm repository. Multi-host TPU support is available in KubeRay v1.1.0+. Note that the YAML file in this example uses serveConfigV2, which KubeRay supports starting from v0.6.0.
Step 3: Install the RayService CR#
# Creates a RayCluster with a single-host v4 TPU worker group of 2x2x1 topology.
kubectl apply -f https://raw.githubusercontent.com/ray-project/kuberay/master/ray-operator/config/samples/ray-service.tpu-single-host.yaml
KubeRay operator v1.1.0 adds a new NumOfHosts field to the RayCluster CR, supporting multi-host worker groups. This field specifies the number of workers to create per replica, with each replica representing a multi-host Pod slice. The value for NumOfHosts should match the number of TPU VM hosts that the given cloud.google.com/gke-tpu-topology node selector expects. For this example, the Stable Diffusion model is small enough to run on a single TPU host, so numOfHosts is set to 1 in the RayService manifest.
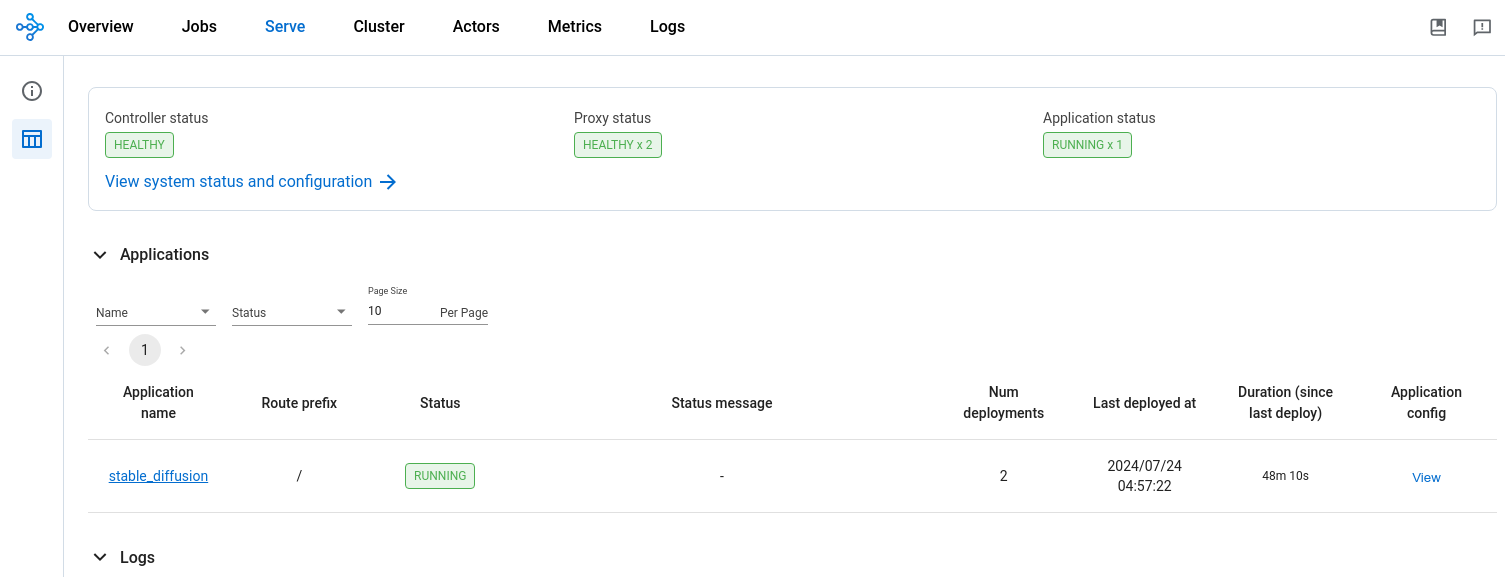
Step 4: View the Serve deployment in the Ray Dashboard#
Verify that you deployed the RayService CR and it’s running:
kubectl get rayservice

# NAME               SERVICE STATUS   NUM SERVE ENDPOINTS
# stable-diffusion-tpu-serve-svc   Running          2
Port-forward the Ray Dashboard from the Ray head service. To view the dashboard, open http://localhost:8265/ on your local machine.
kubectl port-forward svc/stable-diffusion-tpu-head-svc 8265:8265 &
Monitor the status of the RayService CR in the Ray Dashboard from the ‘Serve’ tab. The installed RayService CR should create a running app with the name ‘stable_diffusion’. The app should have two deployments, the API ingress, which receives input prompts, and the Stable Diffusion model server.
Step 5: Send text-to-image prompts to the model server#
Port forward the Ray Serve service:
kubectl port-forward svc/stable-diffusion-tpu-serve-svc 8000
In a separate terminal, download the Python prompt script:
curl -LO https://raw.githubusercontent.com/ray-project/serve_config_examples/master/stable_diffusion/stable_diffusion_tpu_req.py
Install the required dependencies to run the Python script locally:
# Create a Python virtual environment.
python3 -m venv myenv
source myenv/bin/activate

pip install numpy pillow requests tqdm
Submit a text-to-image prompt to the Stable Diffusion model server:
python stable_diffusion_tpu_req.py --save_pictures
The Python prompt script saves the results of the Stable Diffusion inference to a file named diffusion_results.png.