Cluster Launcher Commands#
This document overviews common commands for using the Ray cluster launcher. See the Cluster Configuration docs on how to customize the configuration file.
Launching a cluster (ray up)#
This will start up the machines in the cloud, install your dependencies and run
any setup commands that you have, configure the Ray cluster automatically, and
prepare you to scale your distributed system. See the documentation for ray up. The example config files can be accessed here.
Tip
The worker nodes will start only after the head node has finished
starting. To monitor the progress of the cluster setup, you can run
ray monitor <cluster yaml>.
# Replace '<your_backend>' with one of: 'aws', 'gcp', 'kubernetes', or 'local'.
$ BACKEND=<your_backend>

# Create or update the cluster.
$ ray up ray/python/ray/autoscaler/$BACKEND/example-full.yaml

# Tear down the cluster.
$ ray down ray/python/ray/autoscaler/$BACKEND/example-full.yaml
Updating an existing cluster (ray up)#
If you want to update your cluster configuration (add more files, change dependencies), run ray up again on the existing cluster.
This command checks if the local configuration differs from the applied
configuration of the cluster. This includes any changes to synced files
specified in the file_mounts section of the config. If so, the new files
and config will be uploaded to the cluster. Following that, Ray
services/processes will be restarted.
Tip
Don’t do this for the cloud provider specifications (e.g., change from AWS to GCP on a running cluster) or change the cluster name (as this will just start a new cluster and orphan the original one).
You can also run ray up to restart a cluster if it seems to be in a bad
state (this will restart all Ray services even if there are no config changes).
Running ray up on an existing cluster will do all the following:
If the head node matches the cluster specification, the filemounts will be reapplied and the
setup_commandsandray startcommands will be run. There may be some caching behavior here to skip setup/file mounts.If the head node is out of date from the specified YAML (e.g.,
head_node_typehas changed on the YAML), then the out-of-date node will be terminated and a new node will be provisioned to replace it. Setup/file mounts/ray startwill be applied.After the head node reaches a consistent state (after
ray startcommands are finished), the same above procedure will be applied to all the worker nodes. Theray startcommands tend to run aray stop+ray start, so this will kill currently working jobs.
If you don’t want the update to restart services (e.g. because the changes
don’t require a restart), pass --no-restart to the update call.
If you want to force re-generation of the config to pick up possible changes in
the cloud environment, pass --no-config-cache to the update call.
If you want to skip the setup commands and only run ray stop/ray start
on all nodes, pass --restart-only to the update call.
See the documentation for ray up.
# Reconfigure autoscaling behavior without interrupting running jobs.
$ ray up ray/python/ray/autoscaler/$BACKEND/example-full.yaml \
    --max-workers=N --no-restart
Running shell commands on the cluster (ray exec)#
You can use ray exec to conveniently run commands on clusters. See the documentation for ray exec.
# Run a command on the cluster
$ ray exec cluster.yaml 'echo "hello world"'

# Run a command on the cluster, starting it if needed
$ ray exec cluster.yaml 'echo "hello world"' --start

# Run a command on the cluster, stopping the cluster after it finishes
$ ray exec cluster.yaml 'echo "hello world"' --stop

# Run a command on a new cluster called 'experiment-1', stopping it after
$ ray exec cluster.yaml 'echo "hello world"' \
    --start --stop --cluster-name experiment-1

# Run a command in a detached tmux session
$ ray exec cluster.yaml 'echo "hello world"' --tmux

# Run a command in a screen (experimental)
$ ray exec cluster.yaml 'echo "hello world"' --screen
If you want to run applications on the cluster that are accessible from a web
browser (e.g., Jupyter notebook), you can use the --port-forward. The local
port opened is the same as the remote port.
$ ray exec cluster.yaml --port-forward=8899 'source ~/anaconda3/bin/activate tensorflow_p36 && jupyter notebook --port=8899'
Note
For Kubernetes clusters, the port-forward option cannot be used
while executing a command. To port forward and run a command you need
to call ray exec twice separately.
Running Ray scripts on the cluster (ray submit)#
You can also use ray submit to execute Python scripts on clusters. This
will rsync the designated file onto the head node cluster and execute it
with the given arguments. See the documentation for
ray submit.
# Run a Python script in a detached tmux session
$ ray submit cluster.yaml --tmux --start --stop tune_experiment.py

# Run a Python script with arguments.
# This executes script.py on the head node of the cluster, using
# the command: python ~/script.py --arg1 --arg2 --arg3
$ ray submit cluster.yaml script.py -- --arg1 --arg2 --arg3
Attaching to a running cluster (ray attach)#
You can use ray attach to attach to an interactive screen session on the
cluster. See the documentation for ray attach or
run ray attach --help.
# Open a screen on the cluster
$ ray attach cluster.yaml

# Open a screen on a new cluster called 'session-1'
$ ray attach cluster.yaml --start --cluster-name=session-1

# Attach to tmux session on cluster (creates a new one if none available)
$ ray attach cluster.yaml --tmux
Synchronizing files from the cluster (ray rsync-up/down)#
To download or upload files to the cluster head node, use ray rsync_down or
ray rsync_up:
$ ray rsync_down cluster.yaml '/path/on/cluster' '/local/path'
$ ray rsync_up cluster.yaml '/local/path' '/path/on/cluster'
Monitoring cluster status (ray dashboard/status)#
The Ray also comes with an online dashboard. The dashboard is accessible via
HTTP on the head node (by default it listens on localhost:8265). You can
also use the built-in ray dashboard to set up port forwarding
automatically, making the remote dashboard viewable in your local browser at
localhost:8265.
$ ray dashboard cluster.yaml
You can monitor cluster usage and auto-scaling status by running (on the head node):
$ ray status
To see live updates to the status:
$ watch -n 1 ray status
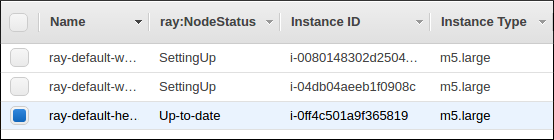
The Ray autoscaler also reports per-node status in the form of instance tags.
In your cloud provider console, you can click on a Node, go to the “Tags” pane,
and add the ray-node-status tag as a column. This lets you see per-node
statuses at a glance:
Common Workflow: Syncing git branches#
A common use case is syncing a particular local git branch to all workers of
the cluster. However, if you just put a git checkout <branch> in the setup
commands, the autoscaler won’t know when to rerun the command to pull in
updates. There is a nice workaround for this by including the git SHA in the
input (the hash of the file will change if the branch is updated):
file_mounts: {
    "/tmp/current_branch_sha": "/path/to/local/repo/.git/refs/heads/<YOUR_BRANCH_NAME>",
}

setup_commands:
    - test -e <REPO_NAME> || git clone https://github.com/<REPO_ORG>/<REPO_NAME>.git
    - cd <REPO_NAME> && git fetch && git checkout `cat /tmp/current_branch_sha`
This tells ray up to sync the current git branch SHA from your personal
computer to a temporary file on the cluster (assuming you’ve pushed the branch
head already). Then, the setup commands read that file to figure out which SHA
they should checkout on the nodes. Note that each command runs in its own
session. The final workflow to update the cluster then becomes just this:
Make local changes to a git branch
Commit the changes with
git commitandgit pushUpdate files on your Ray cluster with
ray up